PositioningLibrary
The library allows the developer to access the position and orientation of the device in an indoor space, through a few lines of code. The library uses Augmented Reality-based Indoor Positioning techniques, in particular focused on the recognition of graphic Markers in the surrounding space.
Watch the Demo
The library provides location updates through an instance of the LocationProvider class, which is provided with a set of user-defined objects:
Building: identifies a structureFloor: identifies a single floor of a structure (Building)Marker: identifies a marker, has a Location that locates it in a FloorLocation: identifies a pose (position and orientation) with respect to the origin of the axes of the Floor it belongs to
:round_pushpin: Positioning of Markers
The Markers will be positioned in the floor to be traced, and subsequently the relative poses will be defined.
- The pose of a Marker is defined by:
- x, y starting from the origin, expressed in meters
- heading (orientation) with respect to the origin, expressed in radians

Example of Floor (in this case a small room) with relative Markers
- :large_orange_diamond: M1 = <x:1.95, y:0>, heading: 0
- :large_orange_diamond: M2 = <x:0.33, y:0.88>, heading: -0.785
- :large_orange_diamond: M3 = <x:3.82, y:1.87>, heading: 3.14
- :large_orange_diamond: M4 = <x:5.10, y:0.85>, heading: 1.57
:open_file_folder: Installation
To add a package dependency to your Xcode project, select File > Add Packages and enter the repository URL.
You can also navigate to your target’s General pane, and in the “Frameworks, Libraries, and Embedded Content” section, click the + button, select Add Other, and choose Add Package Dependency (more info here).
Now that you have the Package, you can import PositioningLibrary into your classes.
:hammer: How To Use
-
To receive location updates, you need to make your class conform to the
LocationObserverprotocol by implementing its methods. A class that conforms toLocationObserverreceives updates regarding the change of location, through objects:ApproxLocation, i.e. coordinates, orientation, radius and angle of approximation (viaonLocationUpdate)Floor(viaonFloorChanged)Building(viaonBuildingChanged)
-
You need to define the data that will be used by the library for the position calculation. Two ways are possible:
:warning: The Building, Floor and Marker IDs must be different from each other.
- Dynamic Creation
-
The user dynamically defines the data, defining the various Buildings, Floors and obviously Markers. Each
Markerwill have a reference to an image that must be inserted in the Assets of the project. Furthermore, for eachMarkerit will be necessary to define its ownLocation, with coordinates and orientation referring to the origin of the axes of the relativeFloor(for example, upper left corner of the plane). Once the data is defined, we can instantiate an object of theLocationProviderclass by passing it the ARView of our app (necessary since we use AR techniques) and the list of newly createdMarkers. Then on theLocationProviderobject it will be possible to register our class asLocationObserverand then call thestart()method to start the position calculation. -
Example:
        let b1 = Building(id: "b1", name: "MoMA", coord: CLLocationCoordinate2D(latitude: 40.76141278416226, longitude: -73.97759781909012))
        let f_1 = Floor(id: "f1_1", name: "ground floor", number: 0, building: b1, maxWidth: 5.10, maxHeight: 2.43)
        let l1 = Location(coordinates: CGPoint(x: 1.95, y: 0), heading: 0, floor: f_1)
        let l2 = Location(coordinates: CGPoint(x: 0.33, y: 0.88), heading: -0.785, floor: f_1)
        let m1 = Marker(id: "S1", image: UIImage(named: "S1")!, physicalWidth: 0.12, location: l1)
        let m2 = Marker(id: "S2", image: UIImage(named: "S2")!, physicalWidth: 0.12, location: l2)

        self.locationProvider = LocationProvider(arView: arView, markers: [m1, m2])
        self.locationProvider.addLocationObserver(locationObserver: self)
        self.locationProvider.start()
-
- Static Creation
-
The user can define his own JSON document following a certain pattern (example of JSON doc). (The images must in any case be loaded on the Assets of the project, the JSON will contain the reference to their name). Then it will be possible to instantiate an object of the
LocationProviderclass by passing it the ARView and the name of the JSON document. Then on theLocationProviderobject it will be possible to register our class asLocationObserverand then call thestart()method to start the position calculation. -
Example:
self.locationProvider = LocationProvider(arView: arView, jsonName: "mydata") self.locationProvider.addLocationObserver(locationObserver: self) self.locationProvider.start() -
- Dynamic Creation
:door: Display the Indoor Map
The library also allows the developer to show the user's position within the map of the floor he is in, updating his position in real-time.
- To be able to show the position of the device on the map, it is first of all necessary to provide the image of the floor plan. You can put it in the Assets of the project and place its reference in the optional parameter
floorMapin theFloorconstructor.
let floor0 = Floor(id: "f1_1", name: "ground floor", number: 0, building: b1, maxWidth: 8.16, maxHeight: 5.3, floorMap: UIImage(named: "piano0")!)
- In the case of using static data creation, insert the reference to the image name in the
floorMapfield in the JSON document.
:warning: It is necessary that the loaded image has no background (for example .png) and is without any padding (no spaces between the start of the image and the start of the map). Furthermore, the upper left corner of the map must coincide with the origin of the Floor chosen when loading the Markers. So for example for the floor of the previous example, the image will be this:

- It is possible to show the indoor map through the
FloorMapViewcomponent, which can be displayed in different ways:- From code: The
LocationProviderobject provides theshowFloorMapmethod which takes care of displaying the map on the screen. When invokingshowFloorMapit is necessary to pass theCGRectobject which indicates the position and size of theFloorMapViewto be displayed.
self.locationProvider.showFloorMap(CGRect(x: 20, y: 40, width: 247, height: 323))
- Using the component in the Storyboard: Simply drag a View component from the Object Library into the View Controller and set its class to
FloorMapView.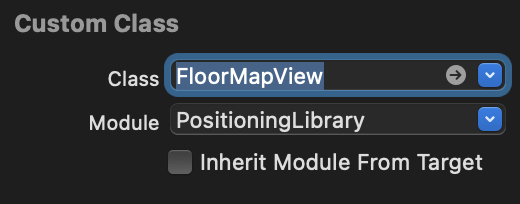
FloorMapView, add it as a subView of the main View and register the component as an Observer of theLocationProvider.arView.addSubview(floorMapView) self.locationProvider.addLocationObserver(locationObserver: floorMapView) - From code: The
:eyes: Demo
In the following repo there is a simple iOS app that uses the library, showing both the user's pose data and the map with the location on the screen.
GitHub
| link |
| Stars: 7 |
| Last commit: 1 year ago |
Swiftpack is being maintained by Petr Pavlik | @ptrpavlik | @swiftpackco | API | Analytics