Sendbird Live UIKit for iOS
![]()
![]()
![]()
![]()
We are introducing a UIKit for Sendbird Live SDK. This UIKit includes pre-built UI components specifically for live streaming features provided by the Sendbird Live SDK. Live UIKit is built on top of Sendbird Chat UIKit.
Table of contents
Requirements Before you start Getting started Implementation Guide
Requirements
The minimum requirements for UiKit for iOS are:
macOSXcodeA device running iOS 11.0 and laterSwift 5.0 and later
Before you start
Sendbird Live UIKit is an add-on to Sendbird Live SDK which provides live streaming feature and uses open channels for chat from Sendbird Chat SDK. Installing the Sendbird Live UIKit will automatically install the Live SDK and the Chat SDK.
Before installing the Live UIKit, create a Sendbird account to acquire an application ID which you will need to initialize the Live UIKit. Go to Sendbird Dashboard and create an application by selecting Calls+Live in product type. Once you have created an application, go to Overview and you will see the Application ID.
Get Started
You can start building your first live event by installing the Live UIKit. When you install the Live UIKit, Sendbird Live SDK will be installed implicitly.
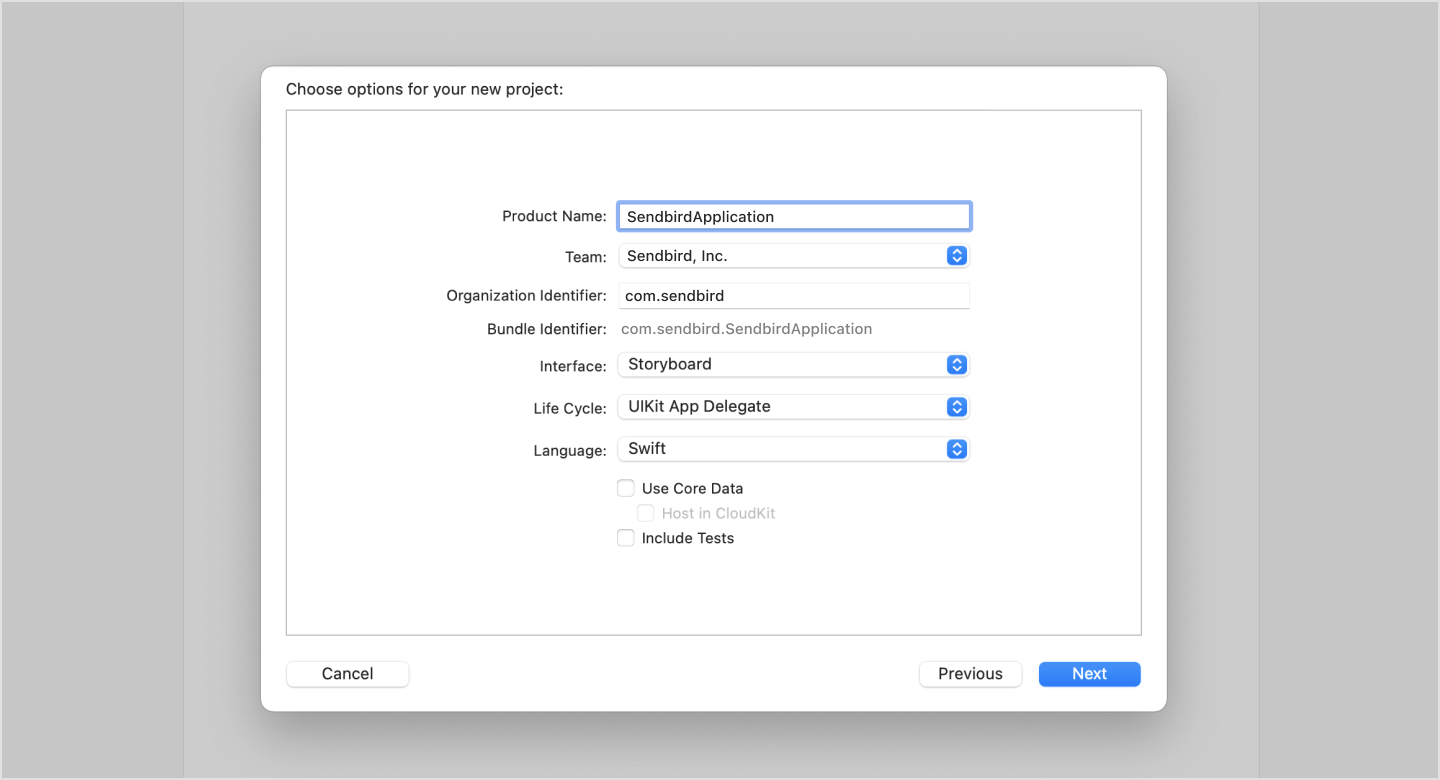
Step 1 Create a project
To get started, open Xcode and create a new project. The Live UIKit for iOS only supports Swift.
Step 2 Install the Live UIKit
You can install the Live UIKit through either Swift Package Manager or CocoaPods. When you install the Live UIKit, its dependencies such as the Live SDK and the Chat SDK will be installed as well. The names of the framework and the main class in the Live UIKit and the Live SDK are SendbirdLiveUI and SendbirdLive, respectively.
Note: If you have already been using Sendbird Chat or want to know the minimum version of the Chat SDK to use the Live UIKit, you can check the information in Sendbird Live SDK.
Swift Packages {data-toc="hide"}
-
Go to your Swift Package Manager's File tab and select Swift Packages. Then choose Add package dependency....
-
Add
SendbirdUIKitinto yourPackage Repositoryas below:
https://github.com/sendbird/sendbird-live-uikit-ios
- To add the package, select Version Rules, enter Up to Next Major, 1.0.0, and click Next.
CocoaPods {data-toc="hide"}
- Add
SendBirdUIKitinto yourPodfileinXcodeas below:
platform :ios, '11.0'
use_frameworks!

target YOUR_PROJECT_TARGET do
    pod 'SendbirdLiveUIKit', '>= 1.0.0' // Add this line.
end
- Install the
SendBirdUIKitframework throughCocoaPods.
$ pod install
- Update the
SendBirdUIKitframework throughCocoaPods.
$ pod update
Step 3 Request permission to access camera and microphone
Your users need to grant the client app the permission to access camera and microphone to stream media. They also need to allow the access to the photo library to send and download images and videos.
<key>NSPhotoLibraryUsageDescription</key>
    <string>$(PRODUCT_NAME) would like access to your photo library</string>
<key>NSCameraUsageDescription</key>
    <string>$(PRODUCT_NAME) would like to access your camera</string>
<key>NSMicrophoneUsageDescription</key>
    <string>$(PRODUCT_NAME) would like to access your microphone</string>
<key>NSPhotoLibraryAddUsageDescription</key>
    <string>$(PRODUCT_NAME) would like to save photos to your photo library</string>
Step 4 Initialize the Live UIKit
To integrate the Live UIKit in the client app, you need to initialize it first. Initialize the SendbirdLiveUI instance by using the application ID of your Sendbird application, which can be found on Sendbird Dashboard.
// AppDelegate.swift

import SendbirdLiveUIKit

func application(_ application: UIApplication, didFinishLaunchingWithOptions launchOptions: [UIApplication.LaunchOptionsKey: Any]?) -> Bool {
    let APP_ID = "YOUR_APP_ID"    // Specify your Sendbird application ID.
    SendbirdLiveUI.initialize(applicationId: APP_ID) { // This is the origin.
        // Initialization of SendbirdUIKit has started.
        // Show a loading indicator.
    } migrationHandler: {
        // DB migration has started.
    } completionHandler: { error in
        // If DB migration is successful, proceed to the next step.
        // If DB migration fails, an error exists.
        // Hide the loading indicator.
    }
}
Step 5 Set current user
Now that you have initialized the Live UIKit, you need to set a user to use the features of the Live UIKit. To do so, provide user information for currentUser in SBUGlobals. The userID field must be specified while other fields such as nickname and profileUrl are optional and will be filled with default values if not specified. You can either use information of a pre-existing user in your Sendbird application or create a new user.
When you use features of a view controller in the Live UIKit, the Live UIKit will automatically call the SendbirdLiveUI.connect() method to establish a connection with the server. You can also manually call the method to connect the user to the Sendbird server.
// AppDelegate.swift

import SendbirdUIKit

func application(_ application: UIApplication, didFinishLaunchingWithOptions launchOptions: [UIApplication.LaunchOptionsKey: Any]?) -> Bool {

    // When only USER_ID is provided.
    SBUGlobals.currentUser = SBUUser(userId: {USER_ID})

    // When all fields are specified.
    SBUGlobals.currentUser = SBUUser(userId: {USER_ID}, nickname:{(opt)NICKNAME} profileUrl:{(opt)PROFILE_URL})

}
Step 6 Display a live event list
Launch the Live UIKit in the client app with LiveEventListViewController, which serves as the starting point for using the Live UIKit to create, enter, and list live events. Implement the code below to start the Live UIKit wherever you would like in the client app.
import SendbirdLiveUIKit

let liveEventListVC = LiveEventListViewController()
let naviVC = UINavigationController(rootViewController: liveEventListVC)
self.present(naviVC, animated: true)
Step 7 Start your first live
You can now run the app on a simulator or a plugged-in device. To start a live event, you must first create a live event by tapping the button in the top-right corner. Add a title, a cover image, and users who can be a host or else the default values will show. Once you have created a live event, tap on the live event to enter. You can choose to enter as a host or a participant and other users can enter the live event as participants.
You can also enter a live event manually as shown below.
liveEvent.enter { error in
    guard error == nil else { return }

    // User successfully entered the live event as a participant.
}
You've successfully started your first live event with Sendbird Live.
GitHub
| link |
| Stars: 0 |
| Last commit: 45 weeks ago |
Release Notes
v1.0.0-beta.5 (Mar 24, 2023)
- Introducing Reactions in Live Events.
- Added reaction button and reaction animation to live event view.
- You can add customized icons and animation to be used when users react to live events.
Swiftpack is being maintained by Petr Pavlik | @ptrpavlik | @swiftpackco | API | Analytics