MarketingScreenshots
This is useful to generate Marketing Screenshots automatically thanks to Test plan and via a simple Swift script.
A Sample project is available as test but also as example of how to integrate the script to your project.
Real project using it can be seen with MemoArt.
Setup your Marketing test plan
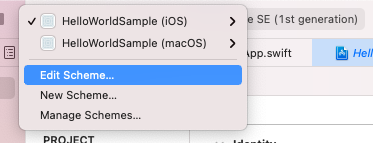
Go on one of your project Scheme
Open Test in the first column, and click on Convert to use Test Plans... button
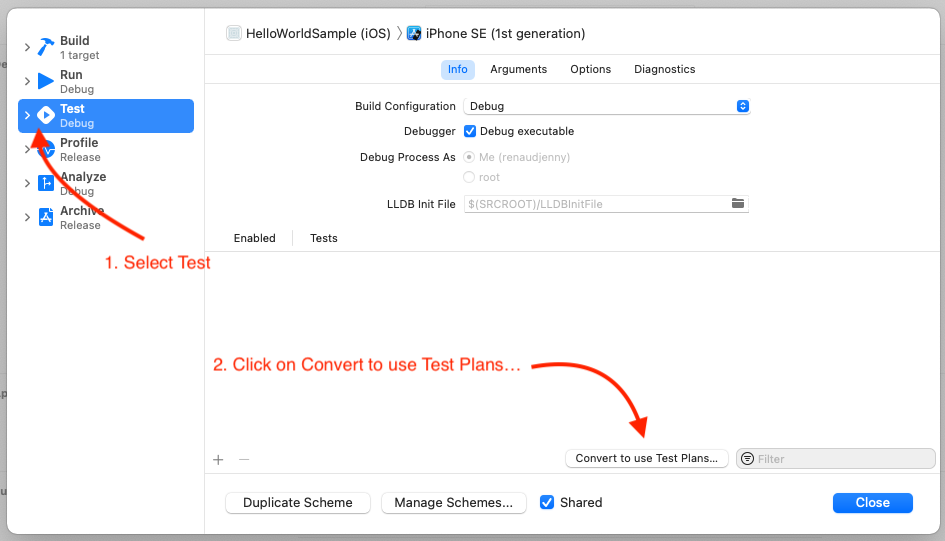
Choose the option that fits better for your project. "Create Test Plan from scheme" is certainly what you want.
Name your test plan to something meaningful, I personally go for "Marketing.xctestplan", because it will be dedicated to our Marketing Screenshots.
Also, I will place it into a folder named UITests Shared because these UI Tests will be shared between each platforms, but that doesn't really matter, the important thing is the name you will give to your test plan (bear this name in mind for later).
Once this is done, you will see a new interface for Test, you can select or unselect Marketing test plan as default or not, that doesn't matter for the later script.
Think about naming the function to something meaningful (this advice is always good anyway), the name of the test will be used to name your screenshot, for instance, MemoArt uses this names: testGameScreenshot, testConfigurationScreenshot, testEasyDifficultyScreenshot, etc.
If it's not done yet, add UI Testing Bundle for each platforms.
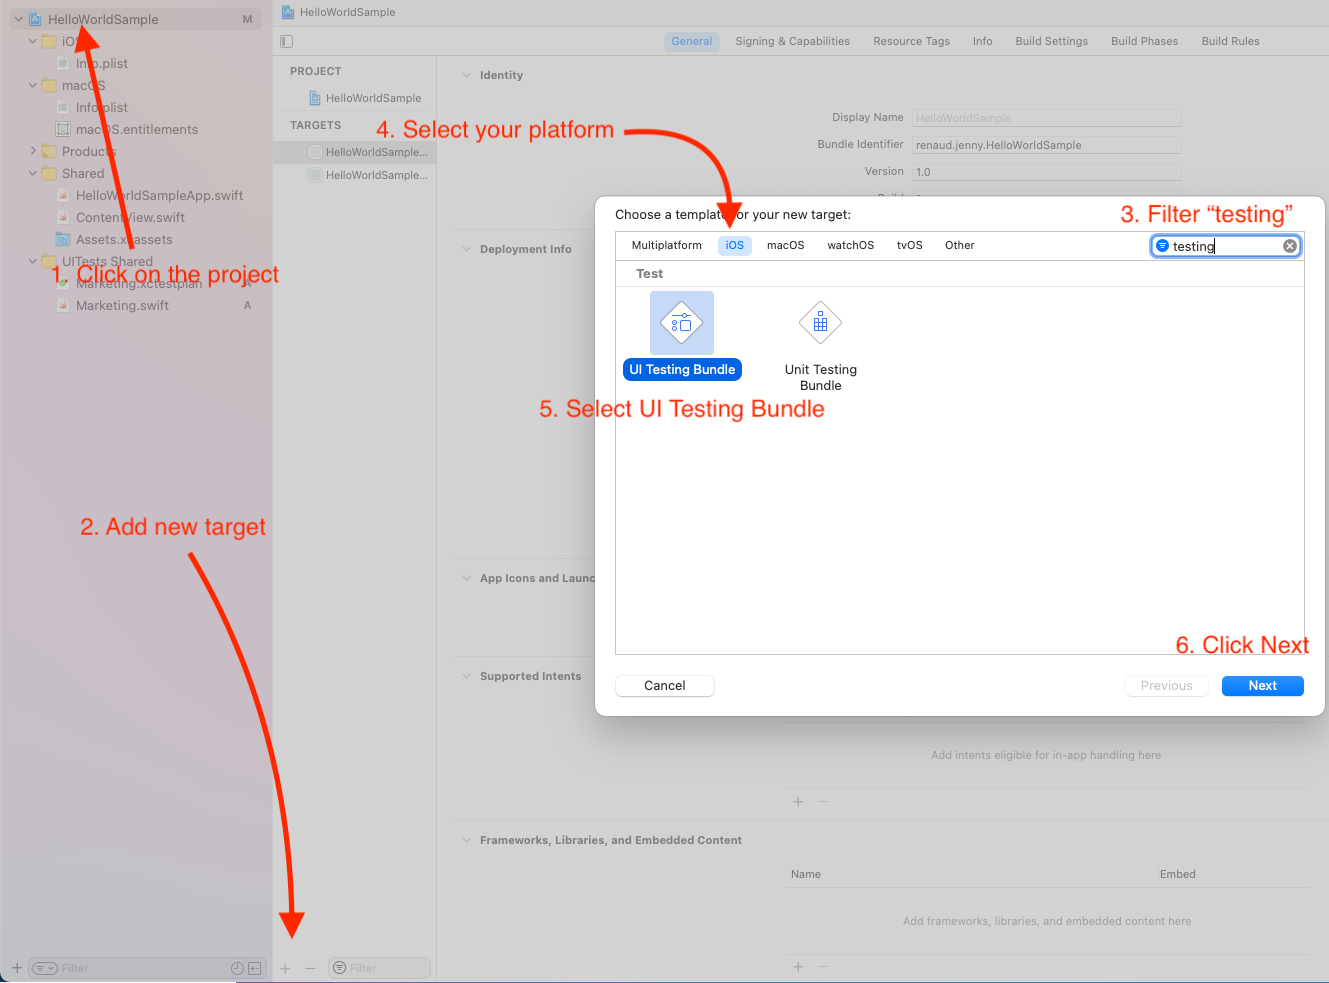
I personally rename the bundle to something simpler, like UITests iOS or UITests macOS or even UITests if I'm not in a multiplatform project. Also, as I'm using shared UI tests between platforms, I'm removing the default UI Test that is provided for each platform. But keep the Info.plist in your UITests iOS and equivalents.
Don't forget to repeat the process for every platform you're supporting for this project.
In a folder UITests Shared (or the equivalent one in your project). Add a new UI Test Case Class, and name it Marketing
When Xcode asks for Target Membership add all the UITests bundle you have. If you missed it, you can still do that later by selecting the test file -> Show File inspector and look for Target Membership.
Edit the file to add your screenshots, what's important is at some point you add screenshots commands, like this
import XCTest

class Marketing: XCTestCase {
    override func setUpWithError() throws {
        continueAfterFailure = true
        XCUIApplication().launch()
    }

    func testMainScreenScreenshot() throws {
        // Do whatever you want to navigate, tap on buttons, etc.

        // These are the instructions to make a screenshot that we can extract later on with the script
        let screenshot = XCUIApplication().screenshot()
        let attachment = XCTAttachment(screenshot: screenshot)
        attachment.lifetime = .keepAlways
        add(attachment)
    }
}
Obviously, add more tests if you want to, every test should contain only one screenshot tho.
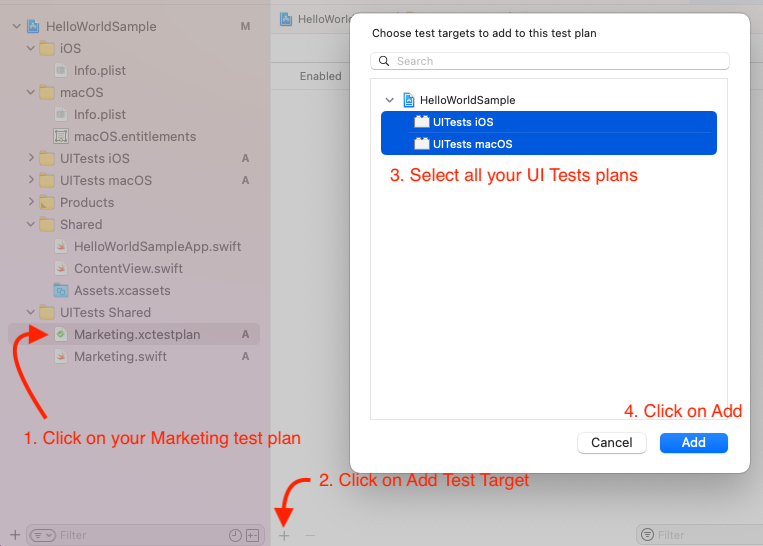
Now click on Marketing.xctestplan and tap on the "+" button to "Add Test Target", select all the bundle you support.
You can manage multiple language (and generate screenshots for each languages you're supporting.
TODO 🛠
Use the commandline tool
You can use the commandline tool by compiling it for release. Inside this project folder do:
swift build -c release
sudo cp $(swift build -c release --show-bin-path)/MarketingScreenshots  /usr/local/bin/marketing-screenshots
sudo is optional on Intel Mac.
If you execute marketing-screenshots --help now you will something like
marketing-screenshots --help
USAGE: marketing-screenshots <path> --scheme <scheme> [--test-plan <test-plan>] --devices <devices> ...

ARGUMENTS:
  <path>                  Path to the project

OPTIONS:
  --scheme <scheme>       Scheme of the project, for instance: HelloWorldSample (iOS)
  --test-plan <test-plan> Test Plan of the Marketing screenshots, for instance: Marketing (default: Marketing)
  --devices <devices>     Choose devices among this list:
                              iPhone 14 Plus
                              iPhone 14 Pro Max
                              iPhone 14 Pro
                              iPhone 14
                              iPhone 8 Plus
                              iPhone SE (3rd generation)
                              iPad Pro (12.9-inch) (6th generation)
                              iPad Pro (12.9-inch) (2nd generation)
                              iPad Pro (11-inch) (4th generation)
  -h, --help              Show help information.
Here is an example.
You are now in your own project where the scheme is HelloWorldSample (iOS), let's say you want to execute the screenshot for iPhone 14 and iPhone 14 Pro, you'll do:
marketing-screenshots . "HelloWorldSample (iOS)" "iPhone 14" "iPhone 14 Pro"
🗂 Project directory: .
Add export directory .ExportedScreenshots
🤖 Check local simulators for these devices:
iPhone 14
iPhone 14 Pro
iPhone 14 simulator is available. Checking the status...
Device state: Shutdown, availability: Available
iPhone 14 Pro simulator is available. Checking the status...
Device state: Booted, availability: Available
Shutting down the device: iPhone 14 Pro
📺 Starting generating Marketing screenshots...
📱 Currently running on Simulator named: iPhone 14 for screenshot size 5.8 inch
📲 Booting the device: iPhone 14
👷♀️ Generation of screenshots for iPhone 14 via test plan in progress
...
Github Action
TODO 🛠
Libraries
This library is using
- XCResultKit to get where to search for screenshots
- XMLCoder to parse XML with ease
GitHub
| link |
| Stars: 3 |
| Last commit: 1 year ago |
Dependencies
Release Notes
Swiftpack is being maintained by Petr Pavlik | @ptrpavlik | @swiftpackco | API | Analytics