Textual Auto Layout

Textual Auto Layout (TAL) helps you create Auto Layout constraints that you can read, understand, and maintain.
In contrast to existing libraries (SnapKit, Cartography), TAL follows a minimization approach. The package consists of a single ~150 lines source file, thus TAL won't have every imaginable feature. Instead you get a dependency ideal for security audits: short and tidy.
To install, use Swift Package Manager or simply copy the source file to your project and you're good to go.
Requirements
- macOS 10.11+ / iOS 9.0+ / tvOS 9.0+
- Swift 5? (probably lower, can't test)
The swift package requires swift-tools-version:5.0 for the new platforms attribute.
Long story
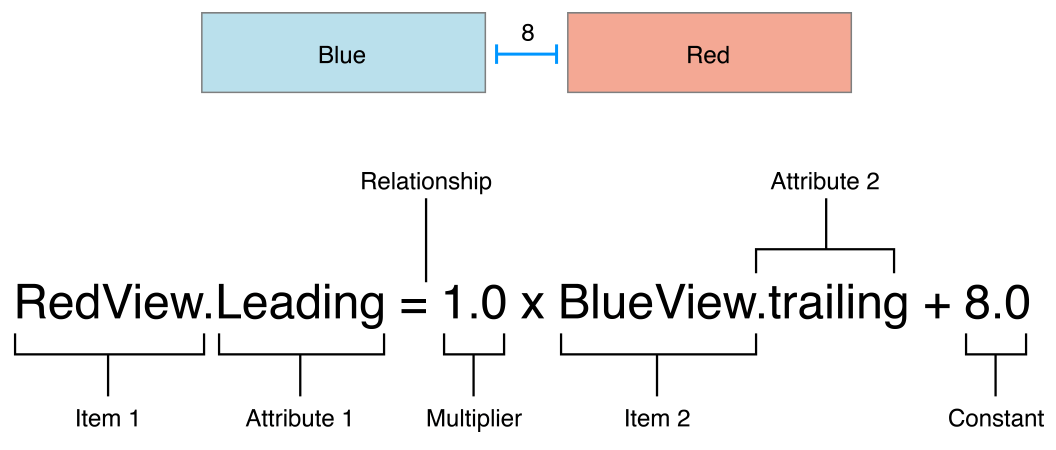
Lets take a look to Apples documentation archive on Auto Layout Guide, Anatomy of a Constraint. There is a wonderful picture that illustrates the constraint relation between two views.
Copyright © 2018 Apple Inc (source)
I love the simplicity of the depiction. However, when you start creating constraints programmatically, the same constraint looks more like this:
let constraint = RedView.leadingAnchor.constraint(equalTo: BlueView.trailingAnchor, constant: 8.0)
constraint.isActive = true
Not only is this hard to read but it gets tedious when you have to create a bunch of constraints (and remember to activate all of them).
Textual Auto Layout (TAL) to the rescue; This is what the same constraint looks like in TAL:
RedView.leadingAnchor =&= BlueView.trailingAnchor + 8.0
This sets all constraint attributes and activates the constraint too. The only slight deviation to the illustration it uses =&= instead of =.
There are two reasons for that. The obvious, = is already used for assignments. But also, you want to handle the other relations too. You have the greaterThanOrEqualTo and lessThanOrEqualTo relations at your disposal (=>= and =<= respectively).
Going into a different dimension
The example above uses a multiplier of 1.0. Technically this is correct, though it does not make sense for location attributes. The documentation is clear:
You cannot use a nonidentity multiplier (a value other than 1.0) with location attributes.
Thats why it is omitted altogether in the =&= relation above. But lets take a look where it does make sense, dimensional constraints:
View.widthAnchor =>= 2 * View.heightAnchor
View.widthAnchor =<= 250
These two constraints ensure that the view is at least twice as wide as tall, but at most 250 pt wide. Readability, 100%.
Again, what would you do without TAL?:
View.widthAnchor.constraint(greaterThanOrEqualTo: View.heightAnchor, multiplier: 2).isActive = true
View.widthAnchor.constraint(lessThanOrEqualToConstant: 250).isActive = true
Prioritize your constraints
Sometimes requiring a specific is just too strong. You can adjust the priority in the same line. Use the pipe symbol (|)1 and append the priority as needed:
View.widthAnchor =&= 250 | .defaultHigh
1 To be consistent with Apple documentation, I'd like to use @ for priority assignment (instead of |). But sadly you can't use @ in an operator declaration.
Doing more things at the same time
Usually you need to set more than a single constraint. For example, you want to set a child view to the same size as the parent view, but inset by 5 px in all directions. You could create these four constraints individually, or use a little helper method:
Child.anchor([.top, .bottom, .left, .right], to: Parent, padding: 5)
The anchor(_,to:) method will use the same relation attribute for both views. In this example the code above is equivalent to:
Child.topAnchor =&= Parent.topAnchor + 5
Child.leftAnchor =&= Parent.leftAnchor + 5
Parent.bottomAnchor =&= Child.bottomAnchor + 5
Parent.rightAnchor =&= Child.rightAnchor + 5
Child.translatesAutoresizingMaskIntoConstraints = false
Notice how bottomAnchor and rightAnchor did change the relation direction instead of using Child =&= Parent - 5 with a negative constant. This makes it easier when debugging constraints. You can simply look for your chosen 5 px padding instead of thinking what edges are involved.
Further you should note that anchor(_,to:) will set translatesAutoresizingMaskIntoConstraints to false. Most of the time you'll want that. In fact you'll probably want to set it for single constraints too. But give it some time and you'll see that you often use both constraint types at the same time.
ChildA.anchor([.leadingMargin, .trailingMargin], to: Parent)
ChildB.anchor([.leadingMargin, .trailingMargin], to: Parent)
ChildB.topAnchor =&= ChildA.bottomAnchor + 8
In that case both relevant views (ChildA and ChildB) have translatesAutoresizingMaskIntoConstraints set. Not Parent though, which is intended. E.g., Parent may have autoresizingMask = [.flexibleWidth, .flexibleHeight].
Limitations
Since the anchor(_,to:) reuses the same relation attribute for both sides, you can't connect two different attributes (e.g., .left =&= .right). You can resolve this issue with individual constraints.
Requiring greater control
Even though it wasn't mentioned in the previous example, you can chain anchor(_,to:) with a priority, same as with individual constraints. Or more general, the anchor method returns a list of constraints. And you can apply functions on constraint lists.
let x: [NSLayoutConstraint]
x = Child.anchor([.left, .right], to: Parent)
x | .defaultLow
// or short
Child.anchor([.left, .right], to: Parent) | .defaultLow
It doesn't stop there. I haven't mention it in the beginning, but every TAL expression has a return type.
View.widthAnchor =<= 250 // returns NSLayoutConstraint
This allows you to chain, reuse or store constraints for later usage.
let compactConstraints = [
	View.widthAnchor =&= 120,
	View.heightAnchor =&= 35
].setActive(false)
let regularConstraints = [
	View.widthAnchor =<= 250,
	View.heightAnchor =<= 50
] // implicitly isActive = true
regularConstraints | .fittingSizeLevel
And lastly, though not as helpful as the other features. You can constraint the intrinsic content size.
Label.constrainHuggingCompression(.vertical, .required)
// which is equivalent to:
Label.setContentHuggingPriority(.vertical, for: .required)
Label.setContentCompressionResistancePriority(.vertical, for: .required)
GitHub
| link |
| Stars: 0 |
| Last commit: 2 years ago |
Swiftpack is being maintained by Petr Pavlik | @ptrpavlik | @swiftpackco | API | Analytics