Pureprofile SDK
Overview
Pureprofile is a survey platform that delivers surveys through the web and mobile apps. The Pureprofile iOS SDK is an easy to use library for developers who want to integrate Pureprofile's surveying platform into their iOS apps.
Project setup
Prerequisites
In order to use the framework in your app you must have Xcode 12.0 or later installed on your system. For the latest versions of Xcode, please visit Apple’s iOS Dev Center.
Run time requirements
The SDK's minimum iOS deployment target is iOS 11.0.
Installation method
You can get the Pureprofile SDK as a swift package, via CocoaPods or by manually installing it in your Xcode project.
Swift Package
Open your application's project in Xcode and from the File menu select Add Packages. Copy Pureprofile's Swift package repository URL
https://github.com/pureprofile/pureprofile-sdk-ios
into the search field, select pureprofile-sdk-ios from the results pane and select Add Package:
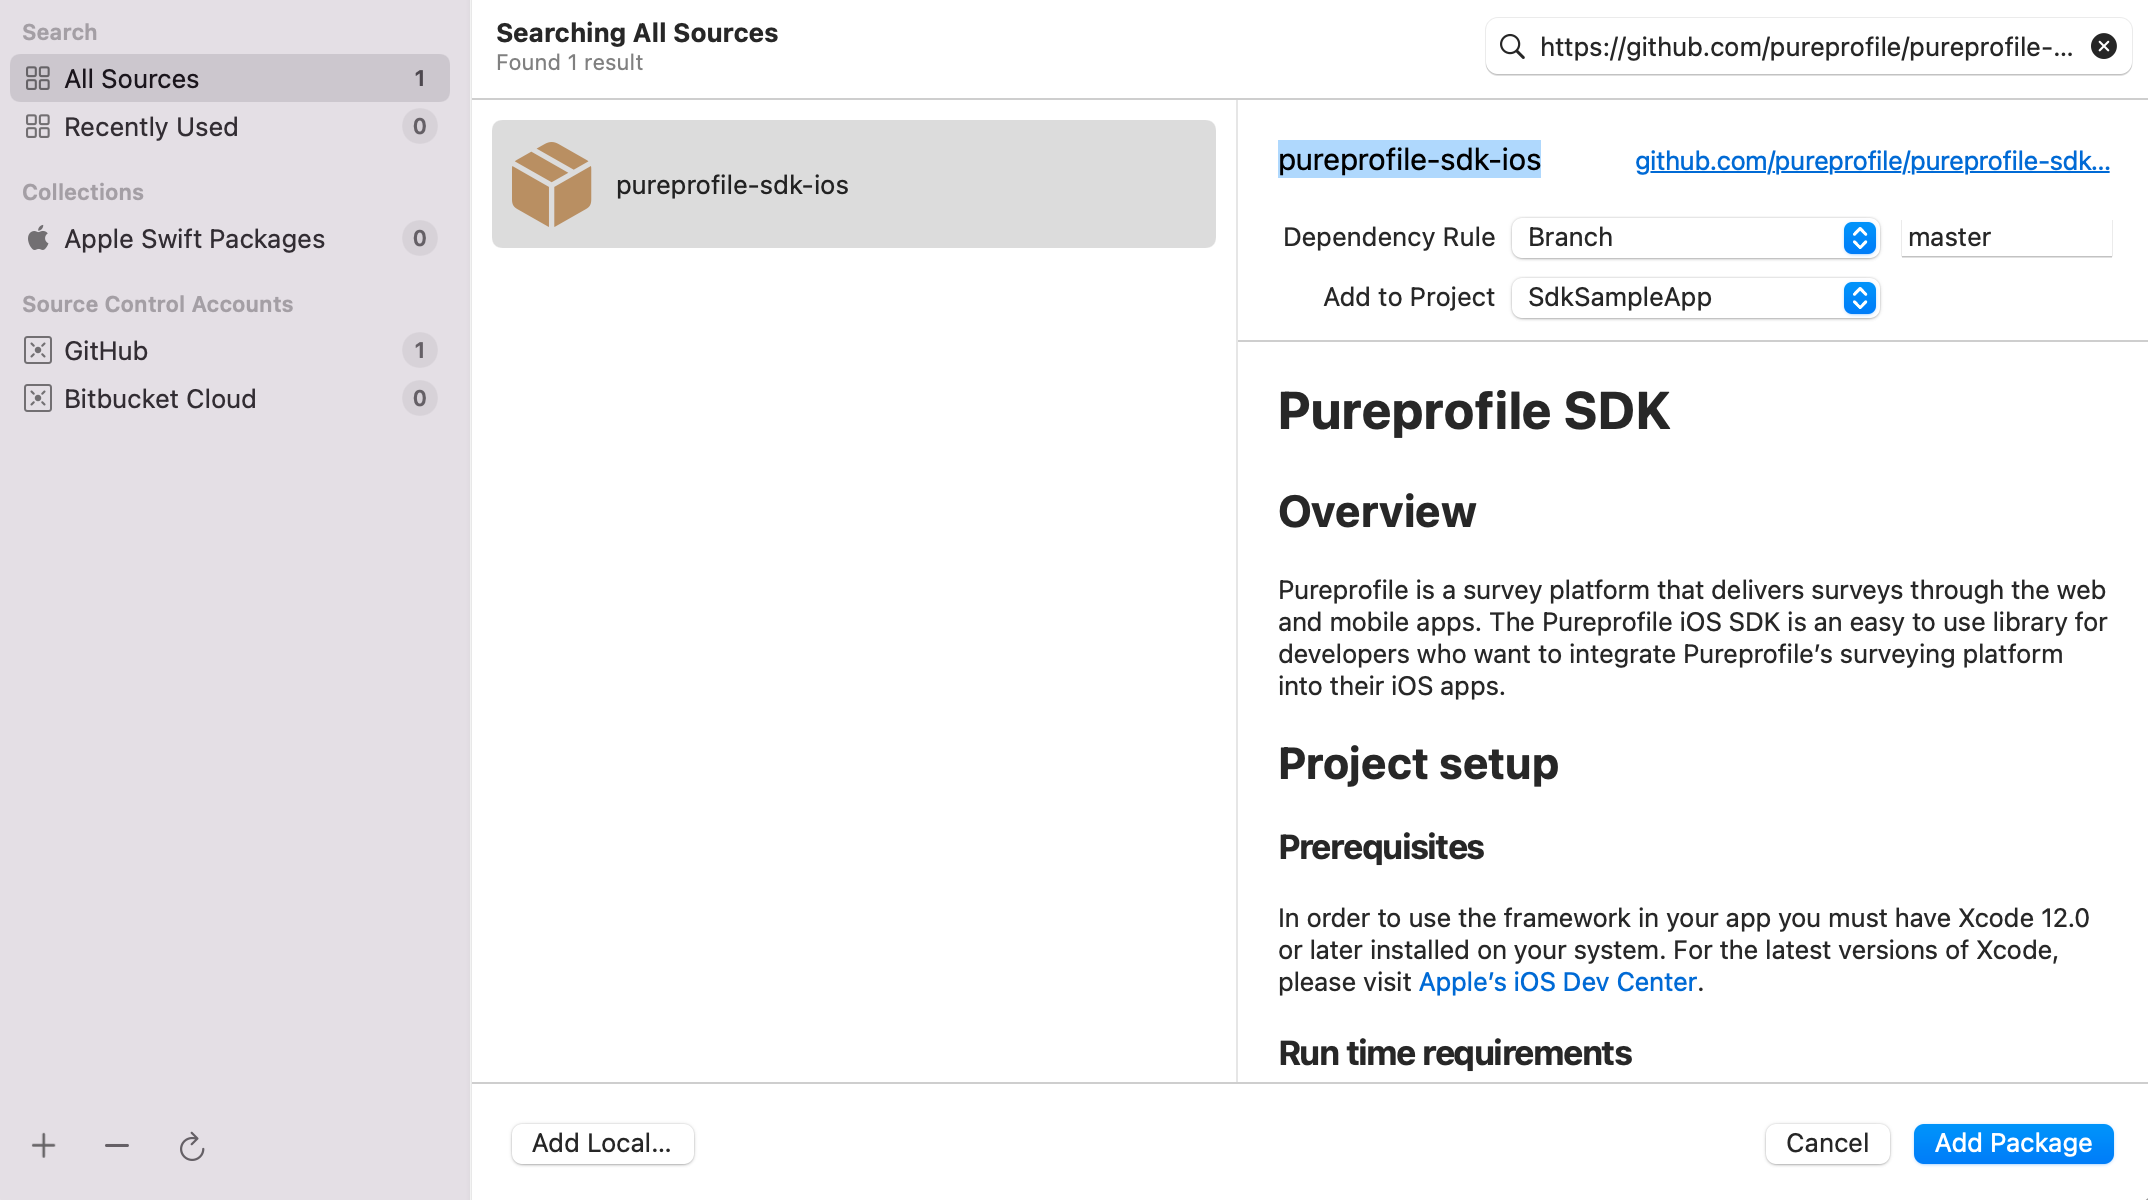
Under Choose Package Options, select Branch: master. After the package download completes, PureprofileSDK should now be listed under Package Dependencies in the Xcode Project navigator.
CocoaPods
Open a command prompt in the Xcode project root directory (where the ‘.xcodeproj’ file is located).
If you do not yet have a Podfile for your project, run the following command to create an empty Podfile:
$ pod init
In a text editor, open the Podfile and add the following library name:
pod 'Pureprofile'
At the command prompt, run the following command to install the Pureprofile pod:
$ pod install
Manual Integration
Download the latest Pureprofile SDK, extract the zip and follow the instructions below to manually integrate the SDK to your Xcode project.
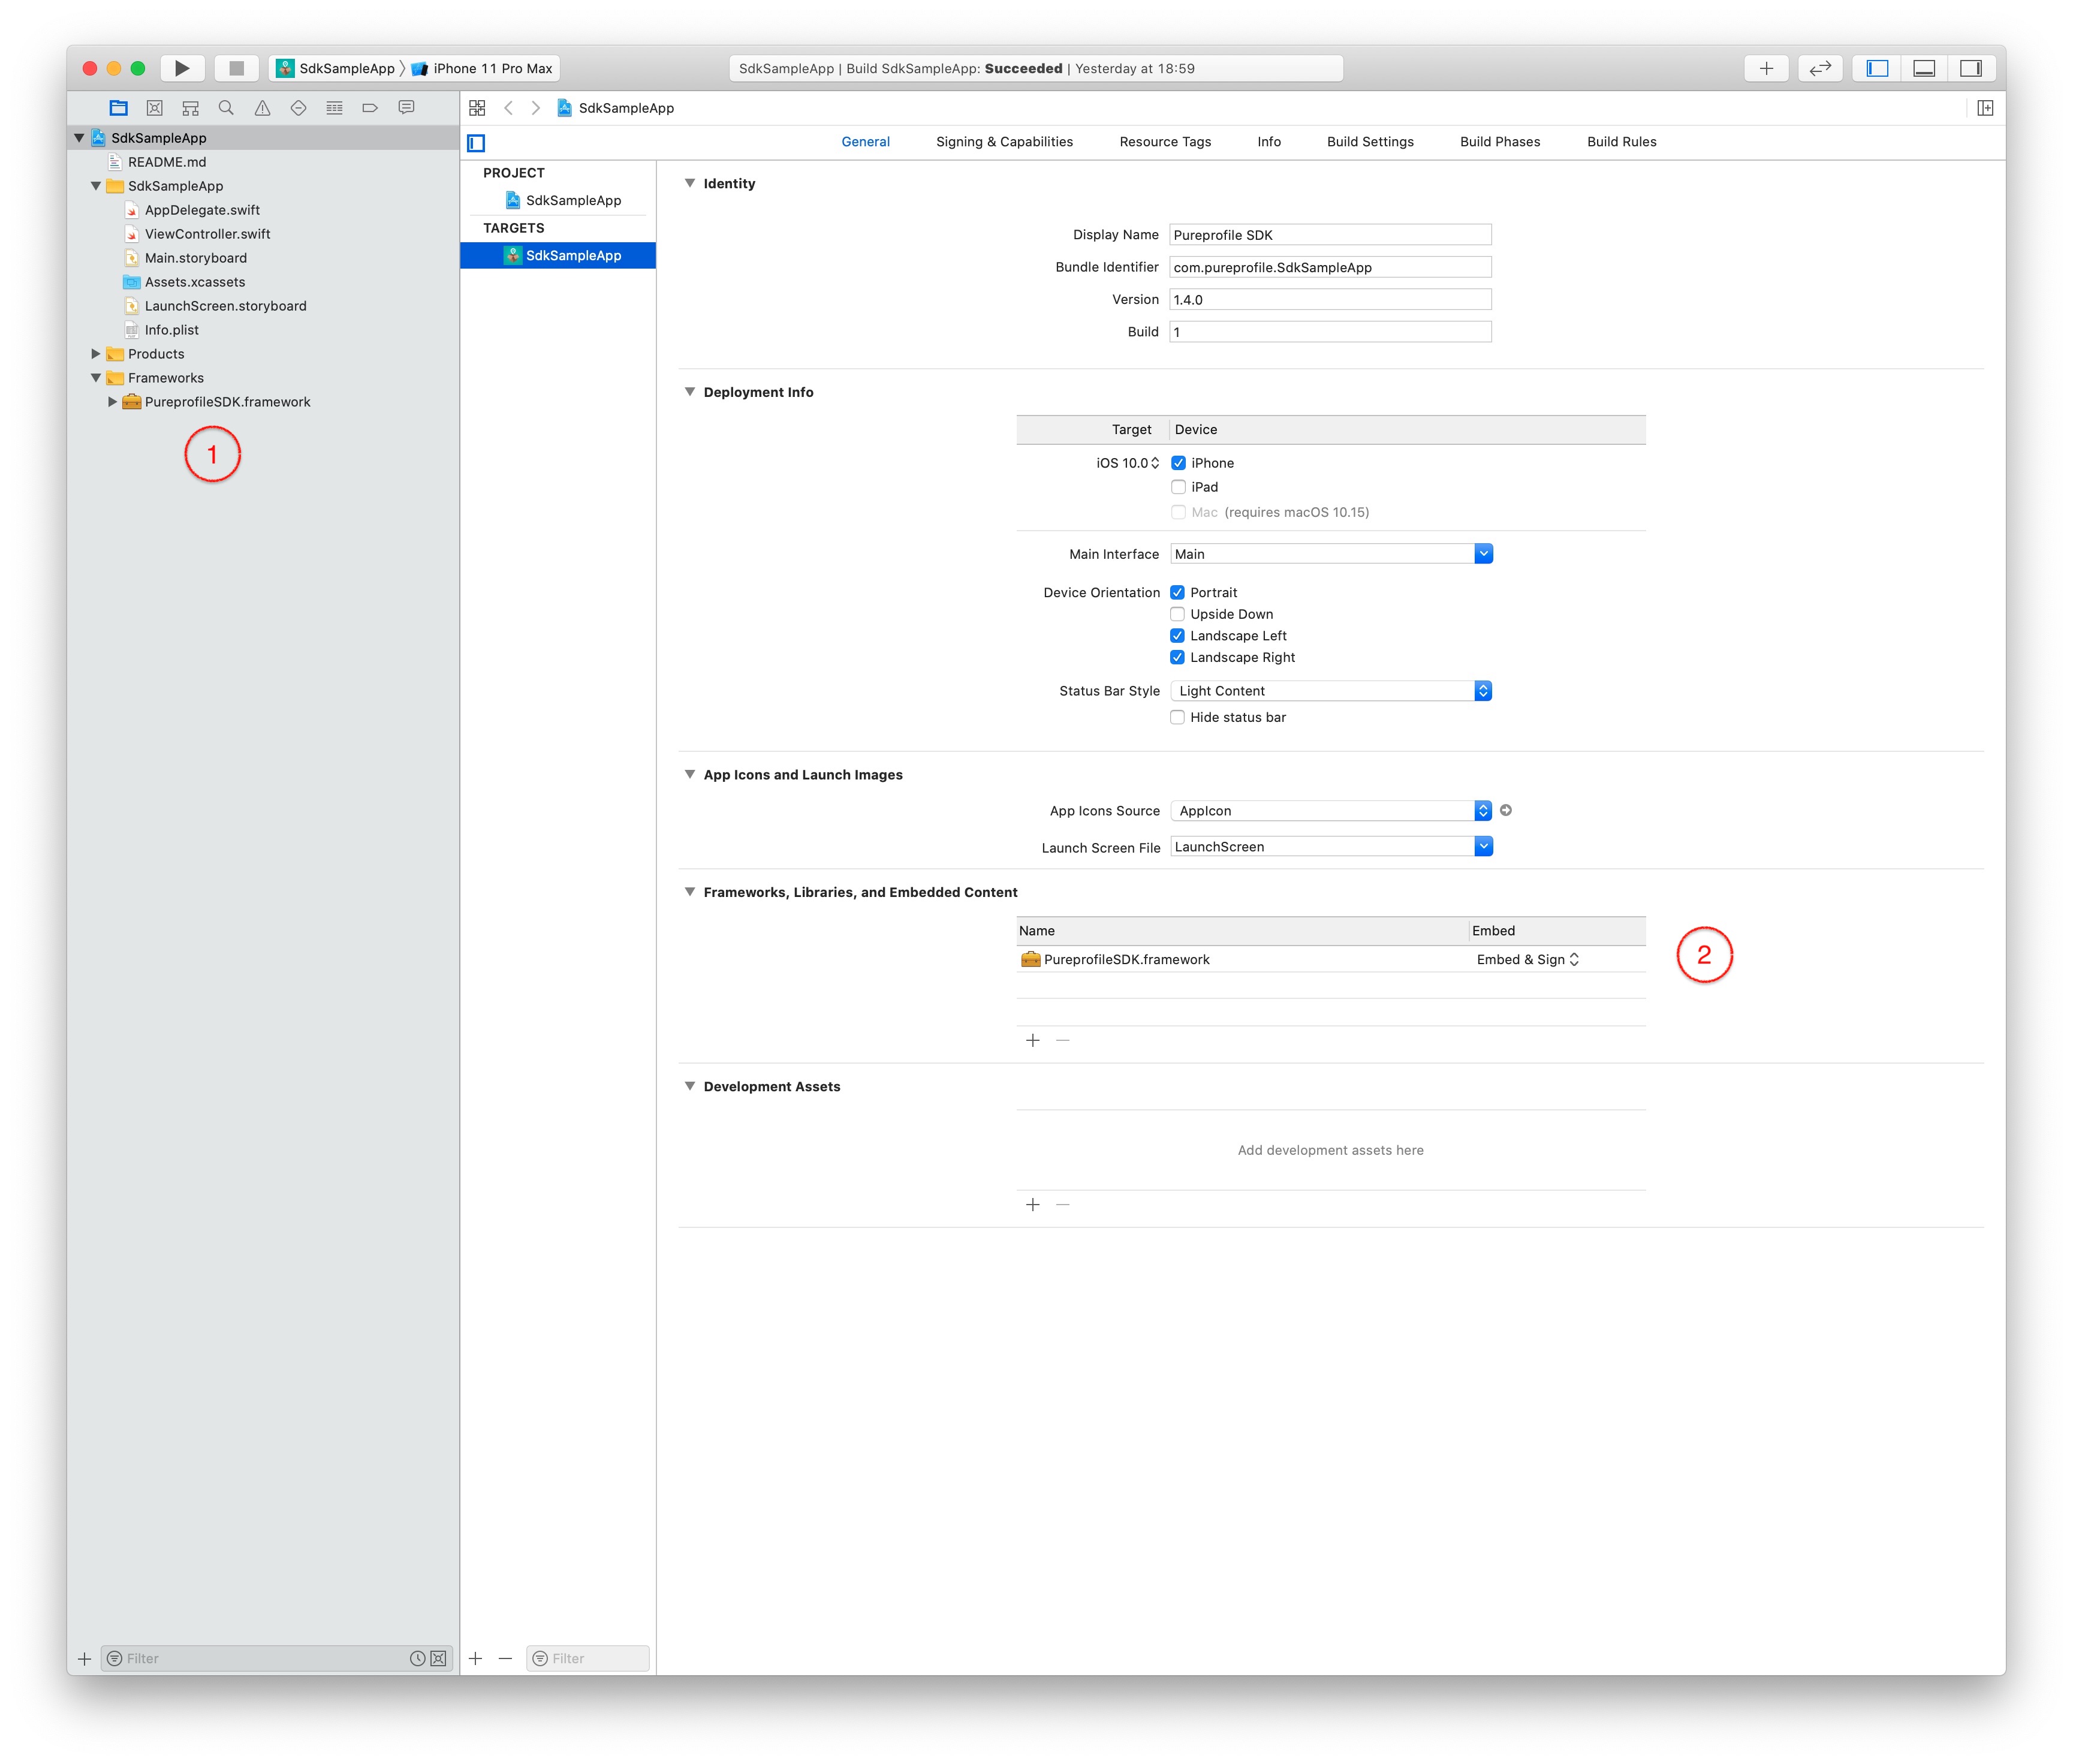
- Add Purerpofile SDK in Xcode
Drag and drop the PureprofileSDK.xcframework bundle to the Frameworks, Libraries and Embedded Content section (2) and from there select Embed & Sign as shown in the screenshot below.
- Always embed Swift standard library build setting (not needed if project already contains Swift code)
For projects with Objective-C only code, you have to set the 'Always embed Swift standard library' setting to yes in you project's Build Settings.
- Installation complete!
You are now ready to use the Pureprofile SDK and allow the users of your app to take Pureprofile surveys and earn rewards! Learn how below in our Quick Start guide.
Quick start guide
Login step
The first step before accessing the Pureprofile SDK is to obtain a login token from Pureprofile. You can do that by calling Pureprofile's login API where you have to pass the following parameters in the POST call:
| Property name | Type | Mandatory | Description |
|---|---|---|---|
| panelKey | String(UUID) | Yes | key which identifies partner or app and obtained by Pureprofile |
| panelSecret | String(UUID) | Yes | secret key assigned to partner |
| userKey | String | Yes | unique identifier of each user (see below for more) |
| email or emailHash | String | Yes | user's email or hashed email |
Response body:
| Property name | Type | Description |
|---|---|---|
| ppToken | String(UUID) | Token that is passed to SDK so it can communicate with Pureprofile's servers |
The values of panelKey and panelSecret are provided by Pureprofile and are used to identify you as Pureprofile's partner. Get in touch with us to find out how to obtain the panel keys.
The userKey is used for uniquely identifying each one of your users. It is recommended that a UUID is used as userKey value and that this UUID never changes so that we can always identify your users in our systems in order to offer them better targeted surveys with maximum yield. There is no restriction though as to the type of user key that is used which means that your user's email or phone number or any other identifier is also accepted. Beware though that in this case if the user identifier ever changes, for example when your user changes his/her email, the next time the user with the changed identifier is logged in to Pureprofile, a new Pureprofile user will be created which means that all targeting information we hold for the said user will no longer be usable and will have to be recreated. The email key can be used to match a userKey with an email.
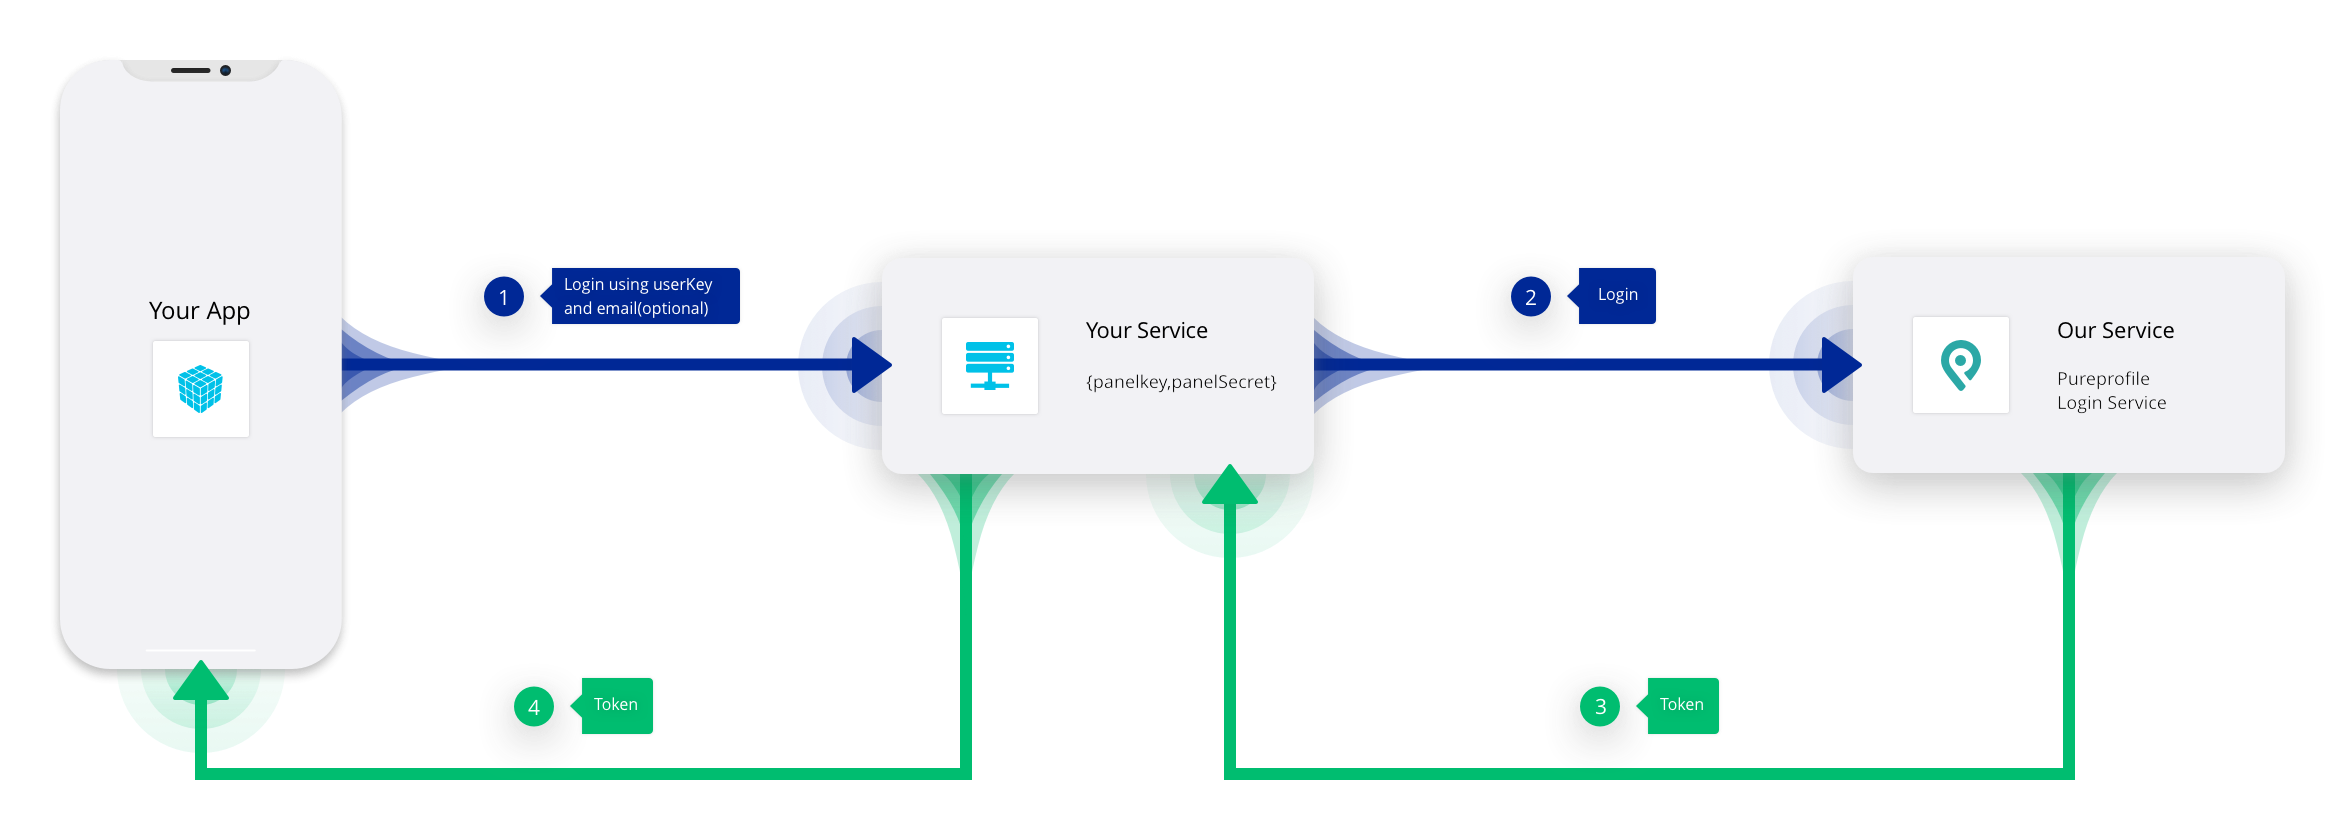
For testing and evaluation purposes Pureprofile provides a public partner account which can be used for running the sample app or for integrating the SDK with your app for evaluation purposes. A full example of how to log in a user, as well as the public partner keys can be found in the source code of the sample app. Bear in mind though that storing sensitive data (such as the panel key and secret) in the source files is not considered good practice and we therefore strongly suggest to employ a secure, server to server communication for obtaining the ppToken from Pureprofile. In this case the login service is called from your server after the authenticity of the client has been verified. See the diagram below for a depiction on how to login via an intermediate secure service.
Membership limit reached
As part of the login process it is possible to encounter the 'membership limit reached' error case which is triggered when the number of your users that have already used at least once the SDK has reached the limit that Pureprofile can accept at the time. The error case is signified with HTTP error code 403 and the body of the response contains error code panel_membership_limit_reached as it can be seen in the example below. An example of how to handle the error in your application can be found in the source code of the sample app. The membership limit is configurable and when you get in touch with Pureprofile you can discuss and set it according to your membership requirements.
{
  "statusCode": 403,
  "error": "Forbidden",
  "message": "We're unable to register you for the panel at this time as the limit of panel members has been reached.",
  "data": {
    "code": "panel_membership_limit_reached"
  }
}
Integrate SDK in your app
Having obtained a user token it's then really easy to enter in Pureprofile's surveying environment. All you need is to create a Pureprofile object and call its open API to present it from any UIViewController:
func open(
    fromViewController: UIViewController,
    loginToken: String,
    allowUseAdvertisingID: Bool = false,
    exitCallback: (() -> Void)? = nil,
    paymentHandler: @escaping (PureprofilePayment) -> Void
)
Swift example:
import PureprofileSDK

Pureprofile().open(fromViewController: self, loginToken: "pureprofile-login-token", exitCallback: { print("Pureprofile has exited") }) { payment in
    print("Received payment of \(payment.value) with payment uuid: \(payment.uuid)")
}
Objective-C example:
@import PureprofileSDK;
#import <PureprofileSDK/PureprofileSDK-Swift.h>

[[Pureprofile new] openFromViewController:self loginToken:@"token" paymentHandler:^(PureprofilePayment * _Nonnull payment) {
    NSLog(@"Received payment of %f with payment uuid %@", payment.value, payment.uuid);
}];
The payment handler can be used for receiving payment info whenever a user completes a survey with a reward. The PureprofilePayment class contains information about the payment where value is the amount awarded to the user for completing a survey:
open class PureprofilePayment: NSObject {
    public let value: Double
    public let uuid: String
    public let createdAt: Date
}
Transactions
The transactions API can optionally be used for querying Pureprofile about a transaction. The transaction-uuid parameter in the endpoint's path is the uuid property of PureprofilePayment (see above). The pp-token value and the instanceUrl path value are returned from the login API.
GET https://<instanceUrl>/api/v3/transactions/<transaction-uuid>?pp-token=<pp-token>

HTTP/1.1 200 OK

{
    "status": "ok",
    "data": {
        "uuid": "transaction-uuid",
        "value": 1.05,
        "createdAt": "2018-11-24T23:33:36+11:00",
        "campaignUuid": "campaign-uuid"
    },
    "ppToken": "pureprofile-token"
}
Be aware that PureprofilePayment events DO NOT give you a full picture about all user transactions, as they cover only direct transactions when users get rewarded after completing a survey. Other transactions might be issued by automatic workers or customer support. To get information about all transactions happening on a panel you have to implement a process that will query our back-end API. More information can be found here.
Count of available surveys
In order to obtain the total number of all and paid surveys at the time of the call you can use:
public func countOfAvailableSurveys(loginToken: String, handler: @escaping (_ allSurveys: Int, _ paidSurveys: Int) -> Void)
You have to pass the login token obtained at the login step detailed above and through the callback you will receive two integers, one for all available surveys and one for the count of paid surveys.
Landscape support
Some surveys are better displayed in landscape mode so from version 1.4.0 landscape support has been added for the surveys that require it. If your app already works in landscape there's nothing you need to do, landscape will automatically work for the SDK too. If it doesn't, adding the code below, will add landscape support in your app but specifically for the Pureprofile SDK. Meaning that landscape will be enabled only when the SDK view controllers that can handle orientation changes will be in foreground. You don't have to take any other consideration for handling orientation changes in any of your view controllers as they will still work only in portrait mode.
In your AppDelegate add the following code:
func application(_ application: UIApplication, supportedInterfaceOrientationsFor window: UIWindow?) -> UIInterfaceOrientationMask {
    if let rootViewController = window?.rootViewController,
        let topViewController = topViewController(with: rootViewController),
        let rotableViewController = topViewController as? PureprofileSDK.RotatableViewController {
        return rotableViewController.supportedOrientations
    }

    return .portrait
}

private func topViewController(with rootViewController: UIViewController) -> UIViewController? {
    if let tabVC = rootViewController as? UITabBarController, let selectedVC = tabVC.selectedViewController {
        return topViewController(with: selectedVC)
    } else if let navVC = rootViewController as? UINavigationController, let visibleVC = navVC.visibleViewController {
        return topViewController(with: visibleVC)
    } else if let presented = rootViewController.presentedViewController {
        return topViewController(with: presented)
    }
    return rootViewController
}
- (UIInterfaceOrientationMask)application:(UIApplication *)application supportedInterfaceOrientationsForWindow:(UIWindow *)window {
    if (window && window.rootViewController) {
        UIViewController *topVC = [self _topViewControllerWithRootViewController:window.rootViewController];
        if (topVC && [topVC conformsToProtocol:@protocol(RotatableViewController)]) {
            id<RotatableViewController> rotatableVC = (id<RotatableViewController>)topVC;
            return rotatableVC.supportedOrientations;
        }
    }

    return UIInterfaceOrientationMaskPortrait;
}

- (UIViewController *)_topViewControllerWithRootViewController:(UIViewController *)rootViewController {
    if ([rootViewController isKindOfClass:[UITabBarController class]]) {
        UITabBarController *tabVC = (UITabBarController *)rootViewController;
        if (tabVC.selectedViewController) {
            return [self _topViewControllerWithRootViewController:tabVC.selectedViewController];
        }
    } else if ([rootViewController isKindOfClass:[UINavigationController class]]) {
        UINavigationController *navVC = (UINavigationController *)rootViewController;
        if (navVC.visibleViewController) {
            return [self _topViewControllerWithRootViewController:navVC.visibleViewController];
        }
    } else if (rootViewController.presentedViewController) {
        return [self _topViewControllerWithRootViewController:rootViewController.presentedViewController];
    }

    return rootViewController;
}
GitHub
| link |
| Stars: 2 |
| Last commit: 8 weeks ago |
Swiftpack is being maintained by Petr Pavlik | @ptrpavlik | @swiftpackco | API | Analytics