


The cure for boring UI code
Do you suffer from ugly layout code and boring UICollectionViewController boilerplate code? Yes, we've all been there. I'm not the only one that has written monstrous view setup functions that look like beasts from hell.
Now, there is a solution to this problem: LBTATools.
There are 3 main issues I want to tackle with this library:
- Use UIStackView to layout everything in a single line.
- Create quick vertical and horizontal lists, but skip the boring cell registration, numItemsForSection, cellForItemAt code.
- Generate a UILabel, UIButton, UIView, etc.. with one line of code.
This library contains extensions and classes that speed up development for my client work. Hopefully, you can take advantage of some of these techniques.
1. Stack vertically and horizontally
Layouts can usually be broken down into some combination of horizontal and vertical UIStackViews. The following examples illustrate usage of stack and hstack for common layout patterns.
Example 1: Simple Vertical Layout

stack(imageView, nameLabel)
Example 2: Horizontal then vertical with center alignment

hstack(imageView,
       stack(nameLabel, messageLabel, spacing: 4),
       spacing: 16, alignment: .center)
// The key is to use stackView.alignment = .center
Example 3: Embedded stacking with layoutMargins.

stack(imageView,
      stack(titleLabel,
      	    descriptionLabel,
      	    UIView(),
      	    exploreLabel, spacing: 16)).withMargins(.allSides(16)
// Using stackView.layoutMargins allows for easy padding manipulation
2. Fast and Easy ListController
Writing iOS apps will almost always involve lists, lots and lots of lists. Most of these will be vertical but horizontal ones are quite common too. Only works for single cell type lists.
Tinder Messages List Example
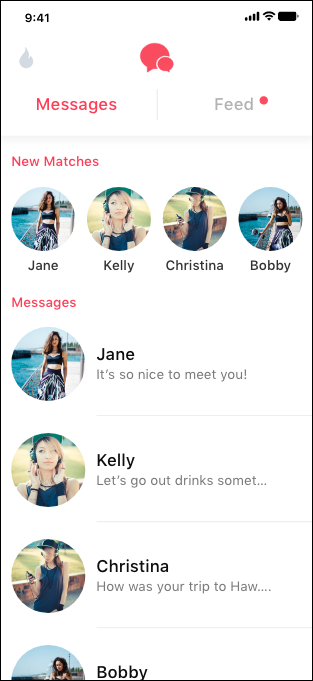
Using LBTAListController, you can build this common pattern with just a few lines. First, let's simplify the view into one vertical list and a header that contains a horizontal list:
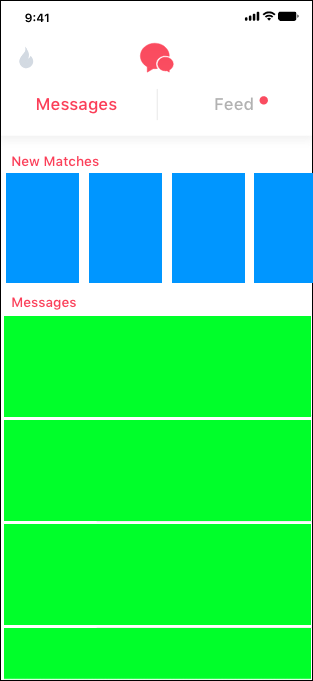
Building this list is very easy now:
class GreenCell: LBTAListCell<UIColor> {
    override var item: UIColor! { didSet { backgroundColor = item }}
}

class SimpleListController: LBTAListController<GreenCell, UIColor, SimpleHeader> {
    override func viewDidLoad() {
        super.viewDidLoad()
        items = [.green, .green, .green, .green]
    }
    // sizing methods
}
The header also contains a ListController component:
class SimpleHeader: UICollectionReusableView {

    class BlueCell: LBTAListCell<UIColor> {
        override var item: UIColor! { didSet { backgroundColor = item }}
    }
    class HeaderHorizontalController: LBTAListController<BlueCell,
        UIColor> {
        override func viewDidLoad() {
            super.viewDidLoad()
            items = [.blue, .blue, .blue, .blue]
        }
    }

    let blueCellsHorizontalController = HeaderHorizontalController(scrollDirection: .horizontal)

    override init(frame: CGRect) {
        super.init(frame: frame)
        stack(blueCellsHorizontalController.view)
    }

    required init?(coder aDecoder: NSCoder) {
        fatalError()
    }
}
Run the example project in this repository to see the code in its entirety. LBTAListController uses the power of Generics to handle dynamics cell and header classes.
3. One line UI elements
One major issue with creating UI elements is the amount of properties we have to set during the setup phase. Here's a very common, and ugly, chunk of code that we want to avoid:
let nameLabel: UILabel = {
    let label = UILabel()
    label.text = "Name"
    label.textColor = .black
    label.textAlignment = .center
    label.font = .boldSystemFont(ofSize: 16)
    label.numberOfLines = 2
    return label
}()
In total, this is 9 lines of code and gets out of control when creating multiple labels, buttons, etc. So instead, let's make this simple and elegant with one line:
let nameLabel = UILabel(text: "Name", font: .boldSystemFont(ofSize: 16), textColor: .black,
	textAlignment: .center, numberOfLines: 2)
All of the above parameters are optional, this means you can also use:
let nameLabel = UILabel(text: "Name", numberOfLines: 2)
Creating UIButtons also fall into this category of code from hell, so let's make it easy with another one-liner:
let nextButton = UIButton(title: "Next", titleColor: .black, font: .boldSystemFont(ofSize: 18),
	backgroundColor: .white, target: self, action: #selector(handleNext))
Video Tutorials
Although this library is very easy to use, I recognize that a lot of you want some visual examples so below are some video tutorials:
Installation
Cocoapods
CocoaPods is an easy to use dependency manager . To install LBTATools, simply add the following line to your Podfile:
pod 'LBTATools'
Swift Package Manager with Xcode 11
Follow this doc
Author
Brian Voong @buildthatapp YouTube
License
LBTATools is available under the MIT license. See the LICENSE file for more info.
GitHub
| link |
| Stars: 728 |
| Last commit: 2 years ago |
Release Notes
ListCell now uses default clear background color ListController's collectionView uses .systemBackground for backgroundColor. This means by default the screen will be white/black in light/dark modes.
Swiftpack is being maintained by Petr Pavlik | @ptrpavlik | @swiftpackco | API | Analytics