OutlineView for SwiftUI on macOS
OutlineView is a SwiftUI view for macOS, which allows you to display hierarchical visual layouts (like directories and files) that can be expanded and collapsed.
It provides a convenient wrapper around AppKit's NSOutlineView, similar to SwiftUI's OutlineGroup embedded in a List or a List with children. OutlineView provides it's own scroll view and doesn't have to be embedded in a List.
Installation
You can install the OutlineView package using SwiftPM.
https://github.com/Sameesunkaria/OutlineView.git
Usage
The API of the OutlineView is similar to the native SwiftUI List with children. However, there is one notable difference; OutlineView requires you to provide an NSView (preferably an NSTableCellView) as the content view. This API decision is discussed in the caveats section.
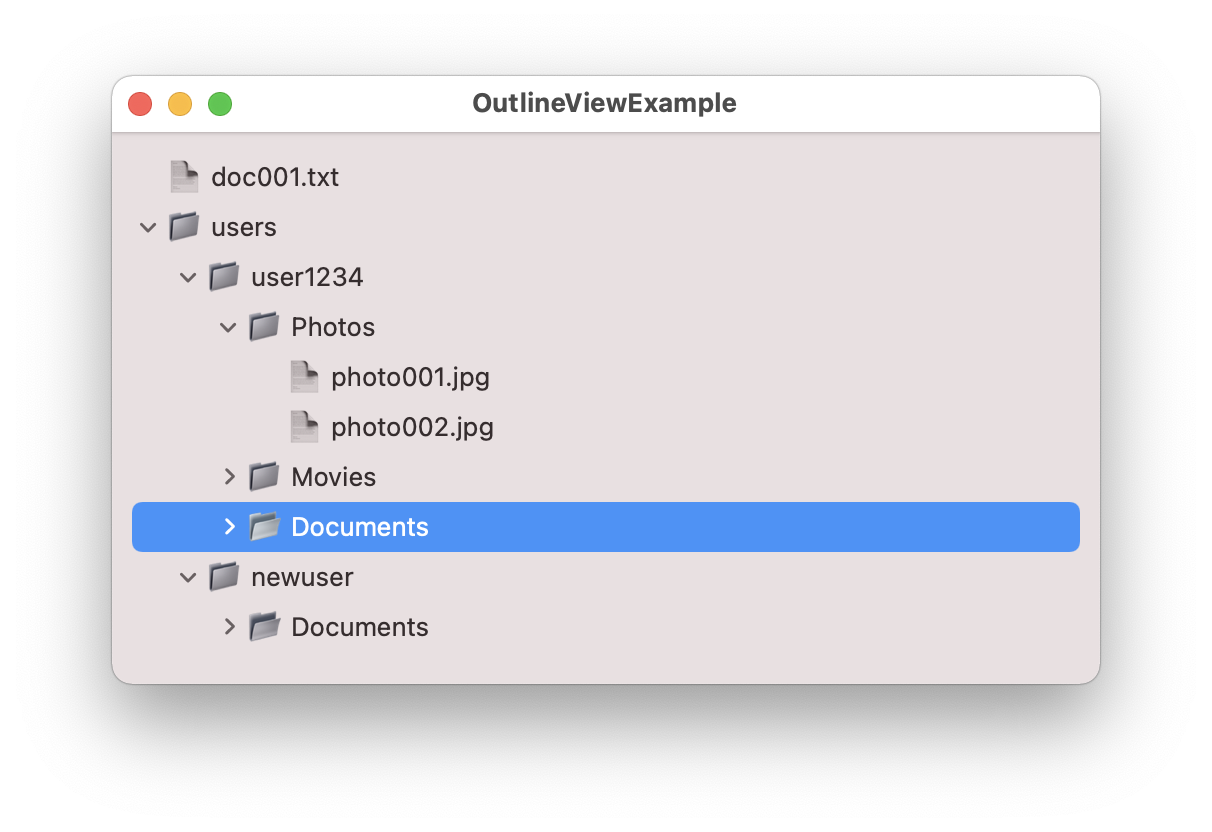
In the following example, a tree structure of FileItem data offers a simplified view of a file system. Passing a sequence of root elements of this tree and the key path of its children allows you to quickly create a visual representation of the file system.
A macOS app demonstrating this example can be found in the Example directory.
struct FileItem: Hashable, Identifiable, CustomStringConvertible {
  // Each item in the hierarchy should be uniquely identified.
  var id = UUID()

  var name: String
  var children: [FileItem]? = nil
  var description: String {
    switch children {
    case nil:
      return "📄 \(name)"
    case .some(let children):
      return children.isEmpty ? "📂 \(name)" : "📁 \(name)"
    }
  }
}

let data = [
  FileItem(
    name: "user1234",
    children: [
      FileItem(
        name: "Photos",
        children: [
          FileItem(name: "photo001.jpg"),
          FileItem(name: "photo002.jpg")]),
      FileItem(
        name: "Movies",
        children: [FileItem(name: "movie001.mp4")]),
      FileItem(name: "Documents", children: [])]),
  FileItem(
    name: "newuser",
    children: [FileItem(name: "Documents", children: [])])
]

@State var selection: FileItem?

OutlineView(data, selection: $selection, children: \.children) { item in
  NSTextField(string: item.description)
}
Customization
Children
There are two types of .children parameters in the OutlineView initializers. You either provide the children for an item using:
- A
KeyPathpointing to an optionalSequenceof the same type as the root data. - A closure that returns an optional
Sequenceof the same type as the root data, based on the parent item.
// By passing a KeyPath to the children:
OutlineView(data, children: \.children, selection: $selection) { item in
  NSTextField(string: item.description)
}

// By providing a closure that returns the children:
OutlineView(data, selection: $selection) { item in
  dataSource.childrenOfItem(item)
} content: { item in
  NSTextField(string: item.description)
}
Style
You can customize the look of the OutlineView by providing a preferred style (NSOutlineView.Style) in the outlineViewStyle method. The default value is .automatic.
OutlineView(data, selection: $selection, children: \.children) { item in
  NSTextField(string: item.description)
}
.outlineViewStyle(.sourceList)
Indentation
You can customize the indentation width for the OutlineView. Each child will be indented by this width, from the parent's leading inset. The default value is 13.0.
OutlineView(data, selection: $selection, children: \.children) { item in
  NSTextField(string: item.description)
}
.outlineViewIndentation(20)
Displaying separators
You can customize the OutlineView to display row separators by using the rowSeparator modifier.
OutlineView(data, selection: $selection, children: \.children) { item in
  NSTextField(string: item.description)
}
.rowSeparator(.visible)
By default, macOS will attempt to draw separators with appropriate insets based on the style of the OutlineView and the contents of the cell. To customize the separator insets, you can use the initializer which takes separatorInsets as an argument. separatorInsets is a closure that returns the edge insets of a separator for the row displaying the provided data element.
Note: This initializer is only available on macOS 11.0 and higher.
let separatorInset = NSEdgeInsets(top: 0, left: 24, bottom: 0, right: 0)

OutlineView(
  data,
  selection: $selection,
  children: \.children,
  separatorInsets: { item in separatorInset }) { item in
  NSTextField(string: item.description)
}
Row separator color
You can customize the color of the row separators of the OutlineView. The default color is NSColor.separatorColor.
OutlineView(data, selection: $selection, children: \.children) { item in
  NSTextField(string: item.description)
}
.rowSeparator(.visible)
.rowSeparatorColor(.red)
Drag & Drop
Dragging From OutlineView
Add the dragDataSource modifier to the OutlineView to allow dragging rows from the OutlineView. The dragDataSource takes a closure that translates a data element into an optional NSPasteboardItem, with a nil value meaning the row can't be dragged).
extension NSPasteboard.PasteboardType {
  static var myPasteboardType: Self {
    PasteboardType("MySpecialPasteboardIdentifier")
  }
}

outlineView
  .dragDataSource { item in
    let pasteboardItem = NSPasteboardItem()
        pasteboardItem.setData(item.dataRepresentation, forType: .myPasteboardType)
    return pasteboardItem
  }
Dropping into OutlineView
Drag events on the OutlineView, either from the dragDataSource modifier or from outside the OutlineView, can be handled by adding the onDrop(of:receiver:) modifier. This modifier takes a list of supported NSPasteboard.PasteboardTypes and a receiver instance conforming to the DropReceiver protocol. DropReceiver implements functions to validate a drop operation, read items from the dragging pasteboard, and update the data source when a drop is successful.
outlineView
  .onDrop(of: [.myPasteboardType, .fileUrl], receiver: MyDropReceiver())

class MyDropReceiver: DropReceiver {
  func readPasteboard(item: NSPasteboardItem) -> DraggedItem<DataElement>? {
    guard let pasteboardType = item.availableType(from: pasteboardTypes) else { return nil }

    switch pasteboardType {
      case .myPasteboardType:
        if let draggedData = item.data(forType: .myPasteboardType) {
          let draggedFileItem = /* instance of OutlineView.Data.Element from draggedData */
          return (draggedFileItem, .myPasteboardType)
        } else {
          return nil
        }
      case .fileUrl:
        if let draggedUrlString = item.string(forType: .fileUrl),
           draggedUrl = URL(string: draggedUrlString)
        {
          let newFileItem = /* instance of OutlineView.Data.Element from draggedUrl */
          return (newFileItem, .fileUrl)
        } else {
          return nil
        }
      default:
        return nil
    }
  }

  func validateDrop(target: DropTarget<DataElement>) -> ValidationResult<DataElement> {
    let draggedItems = target.draggedItems

    if draggedItems[0].type == .myPasteboardType {
      return .move
    } else if draggedItems[0].type == .fileUrl {
      return .copy
    } else {
      return .deny
    }
  }

  func acceptDrop(target: DropTarget<DataElement>) -> Bool {
    // update data source to reflect that drop was successful or not
    return dropWasSuccessful
  }
}
For more details on the various types needed in onDrop, see OutlineViewDragAndDrop.swift, and the sample app OutlineViewDraggingExample.
Why use OutlineView instead of the native List with children?
OutlineView is meant to serve as a stopgap solution to a few of the quirks of OutlineGroups in a List or List with children on macOS.
- The current implementation of updates on a list with
OutlineGroups is miscalculated, which leads to incorrect cell updates on the UI and crashes due to accessing invalid indices on the internal model. This bug makes theOutlineGroupunusable on macOS unless you are working with static content. - It is easier to expose more of the built-in features of an
NSOutlineViewas we have full control over the code, which enables bringing over additional features in the future like support for multiple columns. - Unlike SwiftUI's native
OutlineGrouporListwith children,OutlineViewsupports macOS 10.15 Catalina. OutlineViewsupports row animations for updates by default.
Caveats
OutlineView is implemented using the public API for SwiftUI, leading to some limitations that are hard to workaround.
- The content of the cells has to be represented as an
NSView. This is required asNSOutlineViewhas internal methods for automatically changing the selected cell's text color. A SwiftUITextis not accessible from AppKit, and therefore, any SwiftUITextviews will not be able to adopt the system behavior for the highlighted cell's text color. Providing anNSViewwithNSTextFields for displaying text allows us to work around that limitation. - Automatic height
NSOutlineViews still seems to require an initial cell height to be provided. This in itself is not a problem, but the defaultfittingSizeof anNSViewwith the correct constraints around a multilineNSTextFieldis miscalculated. TheNSTextField's width does not seem to be bounded when the fitting size is calculated (even if a correct max-width constraint was provided to theNSView). So, if you have a variable heightNSView, you have to make sure that thefittingSizeis computed appropriately. (Setting theNSTextField.preferredMaxLayoutWidthto the expected width for fitting size calculations should be sufficient.)
GitHub
| link |
| Stars: 63 |
| Last commit: 1 year ago |
Related Packages
Release Notes
- Added support for a closure based children provider (thanks to @RCCoop).
- Added support for drag and drop (thanks to @RCCoop).
Swiftpack is being maintained by Petr Pavlik | @ptrpavlik | @swiftpackco | API | Analytics