ParallaxSwiftUI
Add some depth to your SwiftUI interface with ParallaxSwiftUI. It uses motion and your devices sensors to create a parallax effect. It's super easy to use and customise.
Installation
Using Swift Package Manager: https://github.com/Priva28/ParallaxSwiftUI
Or you can just copy the ParallaxSwiftUI.swift file to your project.
How to use.
This is all you need to add a parallax effect to any SwiftUI view:
.parallax()
Really, that's it.
How to customize.
Right now you can customise the direction the parallax occurs in, and the amount of the effect.
To set the direction do this:
.parallax(direction: .vertical)
You can use .vertical, .horizontal or .both which is the default.
To set the amount do this:
.parallax(amount: 20)
The default is 10 and the amount will change the amount in pixels that the view can move in any direction.
If you want to get a bit more creative, you can set the amount for each direction like this:
.parallax(minHorizontal: -20, maxHorizontal: 20, minVertical: -5, maxVertical: 5)
This code above will make it so the view can move 20 pixels left and right and 5 up and down.
Complete examples:
.parallax(minHorizontal: 20, maxHorizontal: -20, minVertical: 5, maxVertical: -5, direction: .both)
.parallax(amount: 22, direction: .horizontal)
Pro tip: If you want to invert the direction that the effect occurs in set the min values to a positive and the max values to a negative.
How to best make it work
The Parallax effect uses UIInterpolatingMotionEffect and some representables and hosting controllers to get it working on SwiftUI views. UIKit requires that we specify the frame of the view so therefore I am using GeometryReader to get the proposed size that the parent suggested for your view.
Therefore, because of the nature of GeometryReader, your view will now take up all available space.
To get the effect to best work you should set your modifiers that will change how the view looks first, then the parallax, then modifiers that will change the layout of your view, such as .frame()
Like this:

Real life example
Here is a cool button I made:
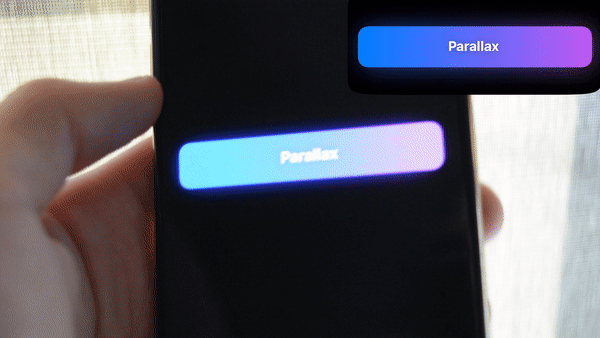
import SwiftUI
import ParallaxSwiftUI

struct ContentView: View {
    var body: some View {
        Button(action: {
            print("Parallax is pretty cool!")
        }, label: {
            ZStack {

                /// Shadow
                LinearGradient(
                    gradient: Gradient(colors: [.init(red: 0, green: 0.5, blue: 1), .purple]),
                    startPoint: UnitPoint(x: 0, y: 0), endPoint: UnitPoint(x: 1, y: 0)
                )
                    .mask(
                        RoundedRectangle(cornerRadius: 15, style: .continuous)
                            .blur(radius: 18)
                    )
                    .blur(radius: 18)
                    .opacity(0.8)
                    .parallax(amount: 18)
                    .frame(height: 60)

                /// Rectangle
                LinearGradient(
                    gradient: Gradient(colors: [.init(red: 0, green: 0.5, blue: 1), .purple]),
                    startPoint: UnitPoint(x: 0, y: 0), endPoint: UnitPoint(x: 1, y: 0)
                )
                    .mask(
                        RoundedRectangle(cornerRadius: 15, style: .continuous)
                    )
                    .frame(height: 60)

                /// Text
                Text("Parallax")
                    .font(.title3)
                    .fontWeight(.bold)
                    .foregroundColor(.primary)
                    .shadow(radius: 5)
                    .parallax(minHorizontal: 10, maxHorizontal: -10, minVertical: 10, maxVertical: -10, direction: .both)
            }
        })
        .padding()
    }
}
GitHub
| link |
| Stars: 151 |
| Last commit: 1 year ago |
Release Notes
This contains all features and is working as expected.
Swiftpack is being maintained by Petr Pavlik | @ptrpavlik | @swiftpackco | API | Analytics