1. Why integrate Ometria in a mobile app?
Ometria helps your marketing department understand and better engage with your customers by delivering personalised emails and push notifications.
The app has two key objectives:
- Getting information about customers (what do they like?)
- Reaching out to customers (saying the right thing to the right people).
For your mobile app, this means:
- Tracking customer behaviour through events - handled by Ometria.
- Sending and displaying push notifications - requires the app developers.
2. Before you begin
See Setting up your mobile app with Firebase credentials in the Ometria help centre and follow the steps there to get an API key.
3. Install the library
The easiest way to get Ometria into your iOS project is by using CocoaPods.
- If you are using CocoaPods for the first time, install CocoaPods using
gem install cocoapodsin terminal. Otherwise, go to step 3. - Run
pod setupto create a local CocoaPods spec mirror. - Create a Podfile in your Xcode project directory by running
pod initin your terminal, edit the Podfile generated and add the following line:pod 'Ometria'. - Run
pod installin your Xcode project directory. CocoaPods should download and install the library, and create a new Xcode workspace. Open this workspace in Xcode or typingopen *.xcworkspacein your terminal.
4. Add Notification Service Extension Target
In order to get the most out of Ometria, you are required to add a new target to your project.
:information_source: The Notification Service Extension has two purposes:
- Starting with iOS 12.0, Apple enabled regular applications to receive and display notifications that contain media content such as images. In order to be able to display the rich content, notifications have to be processed by the Notification Service Extension before being shown to the user.
- There are lots of users that forget to open their apps. In order for Ometria to accurately track all the notifications that were received, it needs to leverage the power of a background service, that has access to all notifications.
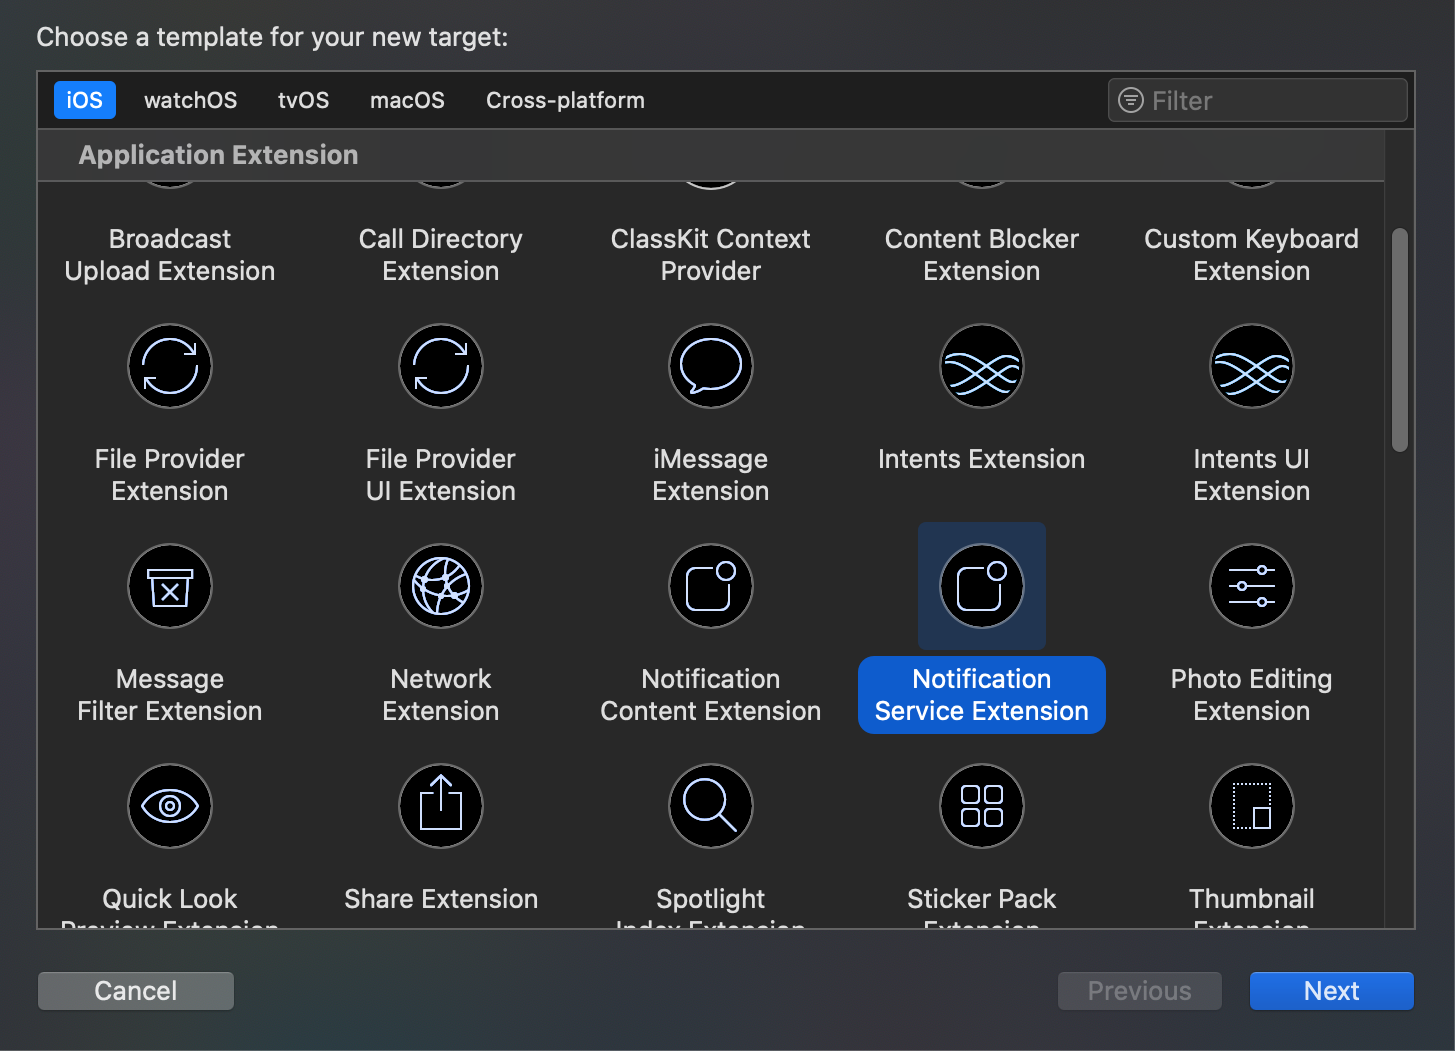
In order to add the extension, go to File > New > Target, and select Notification Service Extension > Next.
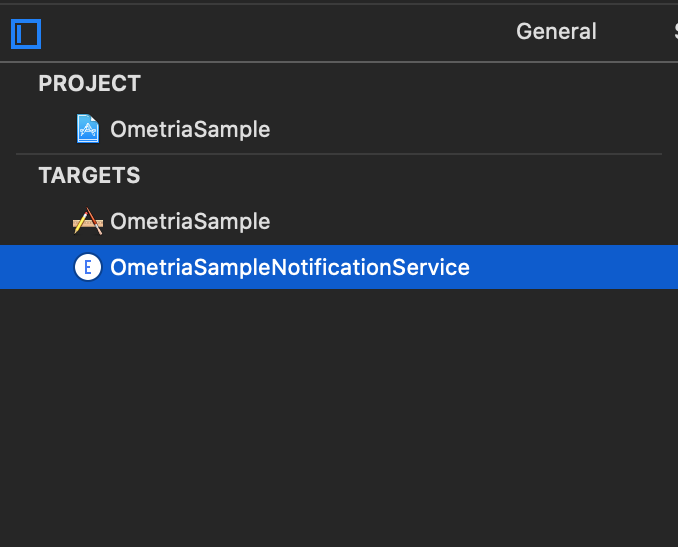
A new item is displayed in your target list:
Next, make sure that the Ometria SDK is also available to this new target by updating your podfile to include your newly added target and specify Ometria as a dependency.
 platform :ios, '10.0'

target 'OmetriaSample' do
  use_frameworks!

  pod 'Ometria'

  target 'OmetriaSampleNotificationService' do
    pod 'Ometria'
  end
end
Create an app group
At this point the main application and the extension function as two separate entities with the only shared component being the code. In order for the extension to obtain read and write access to data that is relevant for the SDK, it requires to be in the same App Group as the main target. This will allow the main target and the extension to share data.
In your project navigator, select your project, then go to Signing & Capabilities and select + Capability in the top left corner.
Once you have done so, a new section will be displayed below Signing. It will allow you to add a new app group. Make sure you select a relevant identifier (e.g.group.[BUNDLE_IDENTIFIER]), and retain the value, as you will need it when instantiating Ometria.
Repeat the process for the Notification Service Extension target, and you should be good to go.
Update NotificationService
To finalise the implementation and allow Ometria to intercept notifications, open the NotificationService class that was automatically created alongside the extension, and replace the content with the following:
import UserNotifications
import Ometria

class NotificationService: OmetriaNotificationServiceExtension {
    override func initializeOmetria -> Ometria? {
        return Ometria.initializeForExtension(appGroupIdentifier: "YOUR_App_GROUP_IDENTIFIER")
    }
}
Now you can receive notifications from Ometria and you are also able to see the images that are attached to your notifications.
5. Initialise the library
To initialise Ometria, you need to enter the API key from 2. Before you begin.
:information_source: Although on Android you are allowed to change what icon is displayed on push notifications, Apple is being more restrictive in this sense. Therefore, push notifications on iOS and ipadOS always use the application icon, and the only changes in layout can be done by user controlled preferences. To find out more about this, see Notifications Interface Guidelines
The best place to do this is in application(_:didFinishLaunchingWithOptions:).
Initialise the library by adding import Ometria and then calling Ometria.initialize(apiToken:appGroupIdentifier:) with your API key and the App Group Identifier you have just created as its arguments.
:information_source: I will quickly remind you that the appGroupIdentifier will allow the notification service extension to read and write data directly inside the cache used by the Ometria SDK.
Once you've called this method once, you can access your instance throughout the rest of your application with sharedInstance().
Ometria uses Firebase Cloud Messaging to send push notifications to the mobile devices.
To do this, add ‘Firebase/Messaging’ as a dependency of Ometria.
- If you installed the library via CocoaPods it is automatically installed.
- If you added Ometria manually in your project, you should install the Firebase SDK separately.
After initialising Ometria, do the same for Firebase Cloud Messaging.
Once complete you will have something like this:
import Ometria

func application(_ application: UIApplication, didFinishLaunchingWithOptions launchOptions: [UIApplication.LaunchOptionsKey: Any]?) -> Bool {
    Ometria.initialize(apiToken: "OMETRIA_API_TOKEN", appGroupIdentifier: "YOUR_APP_GROUP_IDENTIFIER")
    FirebaseApp.configure()
    return
}
Ometria logs any errors encountered during runtime by default.
You can enable advanced logging if you want more information on what’s happening in the background. Just add the following line after initialising the library:
Ometria.sharedInstance().isLoggingEnabled = true
Disabling Swizzling
Method Swizzling is the ability to change the functionality of an existing selector/method at runtime.
:information_source: By default, the Ometria SDK uses Swizzling in order to gain access to data arriving in push messages. We have chosen this method so implementers have to do less work to integrate with the SDK. However, if you are not comfortable with using Swizzling, we have provided a set of methods that need to be called in order to provide the Ometria SDK with the required information to show Push Notifications to the user.
First of all, you will have to update your initializer so that it doesn't use Swizzling.
Ometria.initialize(apiToken: "YOUR_API_TOKEN_HERE", enableSwizzling: false)
Next, you will need to provide the Firebase push token every time Firebase updates it. You can do this in the delegate method from Messaging:
func messaging(_ messaging: Messaging, didReceiveRegistrationToken fcmToken: String?) {
    if let token = fcmToken {
        Ometria.sharedInstance().handleFirebaseTokenChanged(token: token)
    }
}
Finally the Ometria SDK needs to know when users receive and interact with push notifications. The information for those events can be provided in the following methods:
func userNotificationCenter(_ center: UNUserNotificationCenter, didReceive response: UNNotificationResponse, withCompletionHandler completionHandler: @escaping () -> Void) {
    Ometria.sharedInstance().handleNotificationResponse(response)
}

func userNotificationCenter(_ center: UNUserNotificationCenter, willPresent notification: UNNotification, withCompletionHandler completionHandler: @escaping (UNNotificationPresentationOptions) -> Void) {
    Ometria.sharedInstance().handleReceivedNotification(notification)
    completionHandler([.alert, .sound])
}
With all these timely provided, the Ometria SDK should have the information it needs to deliver push notifications to users and gather information on interacting with them.
Using multiple Ometria API tokens within the same app instance (Reinitializing the SDK)
There are cases where different flows of an application should log events under different tokens (think of different regions in your ecommerce setup, or other similar scenarios). To address this, we offer the possibility of reinitializing the Ometria SDK. Although we currently do not keep references to multiple instances of the SDK, we ensure that on reinitialization there will be a flush attempt for all the events that have been logged up to that point on the old instance.
Reinitializing the SDK requires the exact steps as a normal initialization. Please consult 4. Initialise the library in order to make sure everything is set up properly.
6. Event tracking guide
You need to be aware of your users’ behaviour on your platforms in order to understand them. Some behaviour is automatically detectable, other events need work from the app developer to track.
Many of these methods have analogous events in a server-to-server API called the Ometria Data API, and through a separate JavaScript API.
Be aware: If your business already integrates with Ometria in any way, it is very important that the values sent here correspond to those in other integrations.
E.g., the customer identified event takes a customer ID - that ID must be the same here as it is in the data API.
The events are merged on Ometria's side into one big cross-channel view of your customer behaviour, which will otherwise get very messy.
Manually tracked events
Once the SDK is initialised, you can track an event by calling its dedicated method:
let myItem = OmetriaBasketItem(
        productId: "product-1",
        variantId: "variant-product-1"
        sku: "sku-product-1",
        quantity: 1,
        price: 12.0)
let myItems = [myItem]
let myBasket = OmetriaBasket(id: "basket-id", totalPrice: 12.0, currency: "USD", items: myItems, link: "http://sample.link.com")

Ometria.sharedInstance().trackBasketUpdatedEvent(basket: myBasket)
Profile identified
An app user has just identified themselves, i.e. logged in.
trackProfileIdentifiedEvent(customerId: String)
Their customer ID is their user ID in your database.
Sometimes a user only supplies their email address without fully logging in or having an account. In that case, Ometria can profile match based on email:
trackProfileIdentifiedEvent(email: String)
Having a customerId makes profile matching more robust.
It’s not mutually exclusive with sending an email event; for optimal integration you should send either event as soon as you have the information. These two events are pivotal to the functioning of the SDK, so make sure you send them as early as possible.
Profile deidentified
Undo a profileIdentified event.
Use this if a user logs out, or otherwise signals that this device is no longer attached to the same person.
trackProfileDeidentifiedEvent()
Product viewed
A visitor clicks/taps/views/highlights or otherwise shows interest in a product.
E.g. the visitor searches for a term and selects one of the product previews from a set of results, or browses a category of clothes, and clicks on a specific shirt to see a bigger picture.
This event is about capturing interest from the visitor for this product.
trackProductViewedEvent(productId: String)
Basket viewed
The visitor has viewed a dedicated page, screen or modal with the contents of the shopping basket:
trackBasketViewedEvent()
Basket updated
The visitor has changed their shopping basket:
trackBasketUpdatedEvent(basket: OmetriaBasket)
This event takes the full current basket as a parameter - not just the updated parts.
This helps recover from lost or out of sync basket events: the latest update is always authoritative.
Checkout started
The user has started the checkout process.
trackCheckoutStartedEvent(orderId: String)
Order Completed
The order has been completed and paid for:
trackOrderCompletedEvent(orderId: String, basket: OmetriaBasket)
Deep link opened
Based on the implementation status of interaction with notifications that contain deep links, this event can be automatically tracked or not.
The default implementation automatically logs a deep link opened event every time the user interacts with a notification that has a deep link. This is possible because we know that the default implementation will open the link in a browser.
If you chose to handle deep links yourself (using the guide for Handling interaction with notifications that contain URLs), then you should manually track this event when you have enough information regarding the screen (or other destination) that the app will open.
trackDeepLinkOpenedEvent(link: String, screenName: String)
View home page
The visitor views the ‘home page’ or landing screen of your app.
trackHomeScreenViewedEvent()
View list of products
The visitor clicks/taps/views/highlights or otherwise shows interest in a product listing. This kind of screen includes search results, listings of products in a group, category, collection or any other screen that presents a list of products.
E.g., A store sells clothing, and the visitor taps on "Women's Footwear" to see a list of products in that category, or they search for "blue jumper" and see a list of products in that category.
This event should be triggered on:
- search results
- category lists
- any similar screens
trackProductListingViewedEvent(listingType: String?, listingAttributes: [String: Any]?)
Screen viewed
Tracking a visitor’s independent screen views helps us track their engagement with the app, as well as where they are in a journey.
An analogous event on a website would be to track independent page views.
The common eCommerce screens all have their own top-level event: basket viewed, list of products viewed, etc.
Your app may have a specific type of page that is useful for marketers to track engagement with.
E.g. if you’re running a promotion, and viewing a specific screen indicates interest in the promotion, which marketing might later want to follow up on.
To track these custom screens, use the Screen viewed event:
trackScreenViewedEvent(screenName: String, additionalInfo: [String: Any])
Custom events
Your app might have specific flows or pages that are of interest to the marketing team.
E.g. Marketing might want to send an email or notification to any user who signed up for a specific promotion, or interacted with a button or specific element of the app.
If you send a custom event corresponding to that action, they will be able to trigger an automation campaign on it.
Check with the marketing team about the specifics, and what they might need. Especially if they're already using Ometria for email, they will know about automation campaigns and custom events.
trackCustomEvent(customEventType: String, additionalInfo: [String: Any]?)
OmetriaBasket
An object that describes the contents of a shopping basket.
Properties
currency: (String, required) - A string representing the currency in ISO currency format. e.g."USD","GBP"price: (float, required) - A float value representing the pricing.items: (Array[OmetriaBasketItem]) - An array containing the item entries in this basket.link: (String) - A deeplink to the web or in-app page for this basket. Can be used in a notification sent to the user, e.g. "Forgot to check out? Here's your basket to continue: ". Following that link should take them straight to the basket page.
OmetriaBasketItem
An object that describes the contents of a shopping basket.
It can have its own price and quantity based on different rules and promotions that are being applied.
Properties
productId: (String, required) - A string representing the unique identifier of this product.sku: (String, optional) - A string representing the stock keeping unit, which allows identifying a particular item.quantity: (Int, required) - The number of items that this entry represents.price: (Float, required) - Float value representing the price for one item. The currency is established by the OmetriaBasket containing this item
Automatically tracked events
The following events are automatically tracked by the SDK.
Linking and initialising the SDK is enough to take advantage of these; no further integration is required.
| Event | Description |
|---|---|
| Application installed | The app was just installed. Usually can't be sent when the app is actually installed, but instead only sent the first time the app is launched. |
| Application launched | Someone has just launched the app. |
| Application foregrounded | The app was already launched, but it was in the background. It has just been brought to the foreground. |
| Application backgrounded | The app was in active use and has just been sent to the background. |
| Push token refreshed | The push token generated by Firebase has been updated. |
| Notification received | A Push notification was received by the system. |
| Notification interacted | The user has just clicked on / tapped on / opened a notification. |
| Error occurred | An error occurred on the client side. We try to detect any problems with actual notification payload on our side, so we don't expect any errors which need to be fed back to end users. |
Flush tracked events
In order to reduce power and bandwidth consumption, the Ometria library doesn’t send the events one by one unless you request it to do so.
Instead, it composes batches of events that are sent to the backend during application runtime when the one of the following happened:
- it has collected 10 events or
- there was a firebase token refresh (
pushtokenRefreshedevent) - a
notificationReceivedevent (this is not reliable on iOS as the OS prevents the app from knowing about this) - an
appForegroundedevent - an
appBackgroundedevent
You can request the library to send all remaining events to the backend whenever you want by calling:
Ometria.sharedInstance().flush()
Clear tracked events
You can completely clear all the events that have been tracked and not yet flushed.
To do this, call the following method:
Ometria.sharedInstance().clear()
Debugging events
To see what events were captured, you can check the logs coming from the Ometria SDK, if logging is enabled. You can filter for the word "Ometria". The SDK logs all events as they happen, and also logs the flushing i.e. when they are sent to the Ometria mobile events API. Any potential errors with the sending (API issues or event validation issues) would be visible here too.
7. Push notifications guide
When correctly set up, Ometria can send personalised notifications for your mobile application.
Follow these steps:
- Enable your app to receive push notifications by creating an appId and enabling the push notifications entitlement.
- Set up a Firebase account and connect it to Ometria.
- Enable Cloud Messaging on your Firebase account and provide your application’s SSL push certificate.
- Configure push notifications in your application.
- Add a Notification Service Extension to your app in order to enable receiving rich content notifications.
Configure push notifications in your application
Before continuing, you must have already configured:
- The Ometria SDK
- Firebase
Once you managed to properly create or modify your application to support push notifications, you can move on to configure everything in your AppDelegate like so:
import UserNotifications

@UIApplicationMain
class AppDelegate: UIResponder, UIApplicationDelegate, UNUserNotificationCenterDelegate {

    func application(_ application: UIApplication, didFinishLaunchingWithOptions launchOptions: [UIApplication.LaunchOptionsKey: Any]?) -> Bool {
        Ometria.initialize(apiToken: "OMETRIA_API_TOKEN")
        FirebaseApp.configure()
        configurePushNotifications()

        return true
    }

    func configurePushNotifications() {
        UNUserNotificationCenter.current().delegate = self
        let authOptions: UNAuthorizationOptions = [.alert, .badge, .sound]
        UNUserNotificationCenter.current().requestAuthorization(options: authOptions) {
            [weak self] (granted, error) in

            print("Permission granted: \(granted)")
            guard granted else { return }
            self?.getNotificationSettings()
        }
        UIApplication.shared.registerForRemoteNotifications()
    }

    func getNotificationSettings() {
        UNUserNotificationCenter.current().getNotificationSettings { settings in
            print("Notification settings: \(settings)")
            guard #available(iOS 12.0, *), settings.authorizationStatus == .provisional ||
            settings.authorizationStatus == .authorized else {
                return
            }

            DispatchQueue.main.async {
                UIApplication.shared.registerForRemoteNotifications()
            }
        }
    }

    func application(_ application: UIApplication, didRegisterForRemoteNotificationsWithDeviceToken deviceToken: Data) {
        print("Reaching Did register for remote notifications")
        // handle your own device token handling here
    }

    func userNotificationCenter(_ center: UNUserNotificationCenter, didReceive response: UNNotificationResponse, withCompletionHandler completionHandler: @escaping () -> Void) {
        print("Reaching Did receive notification response")
        // handle how your app reacts to receiving a push notification while it is running in foreground
    }

    func userNotificationCenter(_ center: UNUserNotificationCenter, willPresent notification: UNNotification, withCompletionHandler completionHandler: @escaping (UNNotificationPresentationOptions) -> Void) {
        print("Reaching Will present notification")
        // handle how you want your notification to be presented while the app is running in foreground
    }
}
The Ometria SDK will automatically source all the required tokens and provide them to the backend.
This way your app will start receiving notifications from Ometria. Handling those notifications while the app is running in the foreground is up to you.
Handling interaction with notifications
Ometria allows you to send URLs and tracking info alongside your push notifications and allows you to handle them on the device.
By default, the Ometria SDK automatically handles any interaction with push notifications that contain URLs by opening them in a browser.
However, it enables developers to handle those URLs as they see fit (e.g. take the user to a specific screen in the app).
To get access to those interactions and the URLs, implement the OmetriaNotificationInteractionDelegate.
This is what it would look like in code:
import UserNotifications

@UIApplicationMain
class AppDelegate: UIResponder, UIApplicationDelegate, UNUserNotificationCenterDelegate,  OmetriaNotificationInteractionDelegate {

    func application(_ application: UIApplication, didFinishLaunchingWithOptions launchOptions: [UIApplication.LaunchOptionsKey: Any]?) -> Bool {
        Ometria.initialize(apiToken: "OMETRIA_API_TOKEN")
        Ometria.sharedInstance().notificationInteractionDelegate = self

        return true
    }

    // This method will be called each time the user interacts with a notification from Ometria
    // Write your own custom code in order to properly redirect the app to the screen that should be displayed.
    func handleOmetriaNotificationInteraction(_ notification: OmetriaNotification) {
        print(notification.deepLinkActionUrl)
    }
}
The OmetriaNotification object also provides access to other fields in the notification payload, including custom tracking properties that you choose to send.
One can access all of these fields in the above-mentioned method.
If for some reason developers need access to the OmetriaNotification object in a context other than the OmetriaNotificationInteractionDelegate, Ometria SDK provides a method called parseNotification(_ content:UNNotificationContent) for this purpose:
import UserNotifications

@UIApplicationMain
class AppDelegate: UIResponder, UIApplicationDelegate, UNUserNotificationCenterDelegate,  OmetriaNotificationInteractionDelegate {

    func userNotificationCenter(_ center: UNUserNotificationCenter, willPresent notification: UNNotification, withCompletionHandler completionHandler: @escaping (UNNotificationPresentationOptions) -> Void) {
        let notificationContent = notification.request.content
        let ometriaNotification = Ometria.sharedInstance().parseNotification(notificationContent)
        completionHandler([.alert, .sound])
    }
}
8. Universal links guide
Ometria sends personalised emails with URLs that point back to your website. In order to open these URLs inside your application, make sure you follow this guide.
Pre-requisites
First, make sure you have an SSL-enabled Ometria tracking domain set up for your account. You may already have this for your email campaigns, but if not ask your Ometria contact to set one up, and they should provide you with the domain.
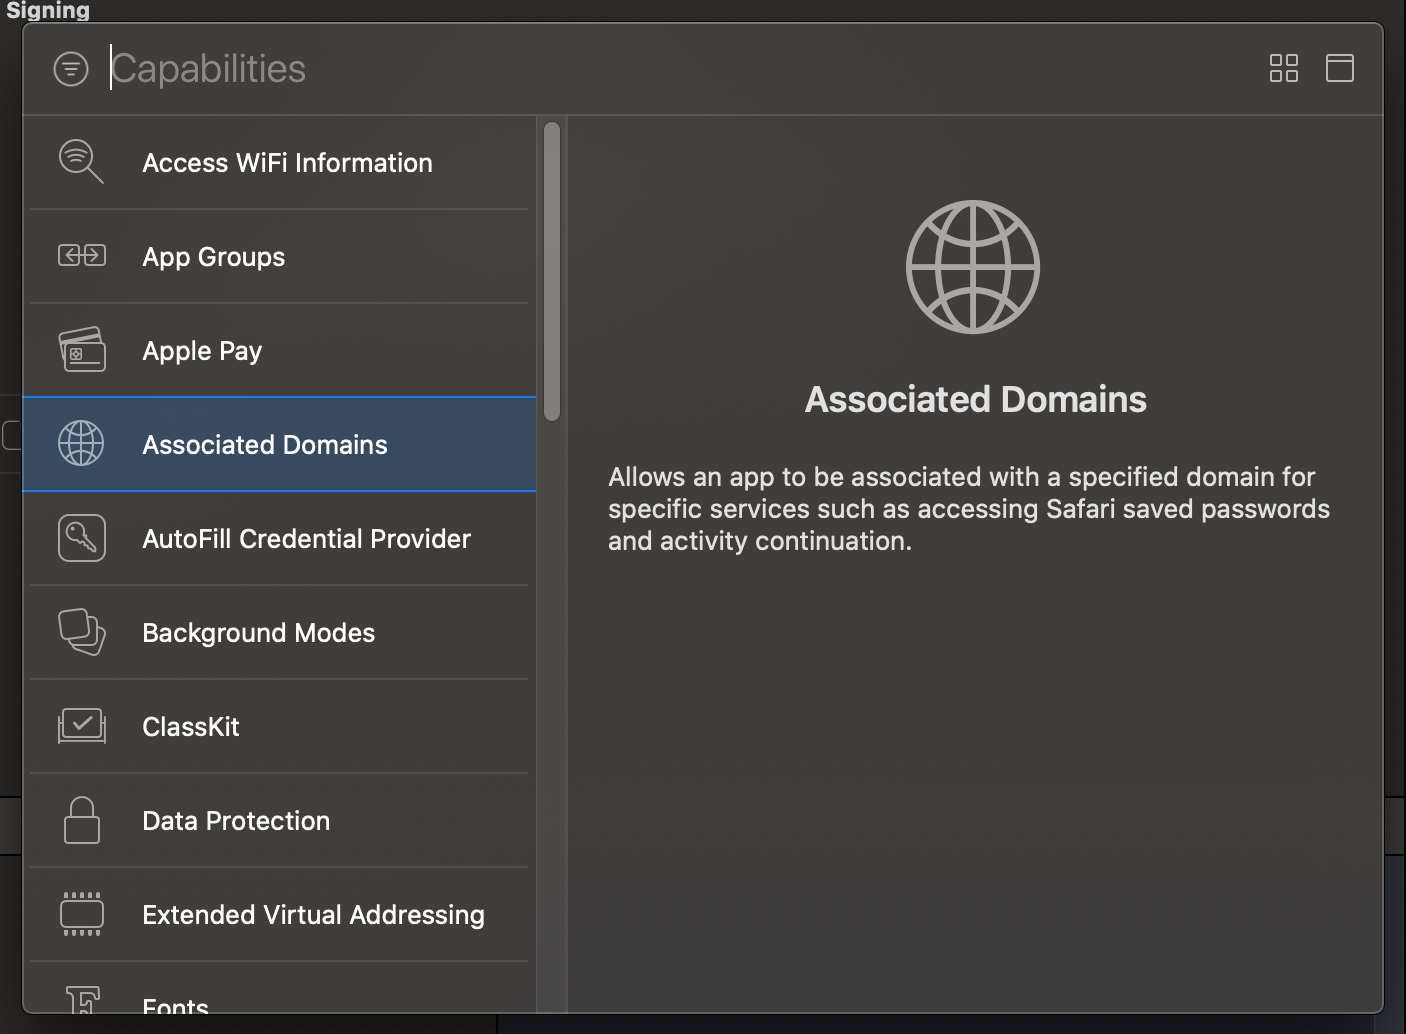
Enable the Associated Domains entitlement for your application
To do this, select your project in Xcode, and go to Targets > Your application Target > Signing & Capabilities, and add the Associated Domains capability.
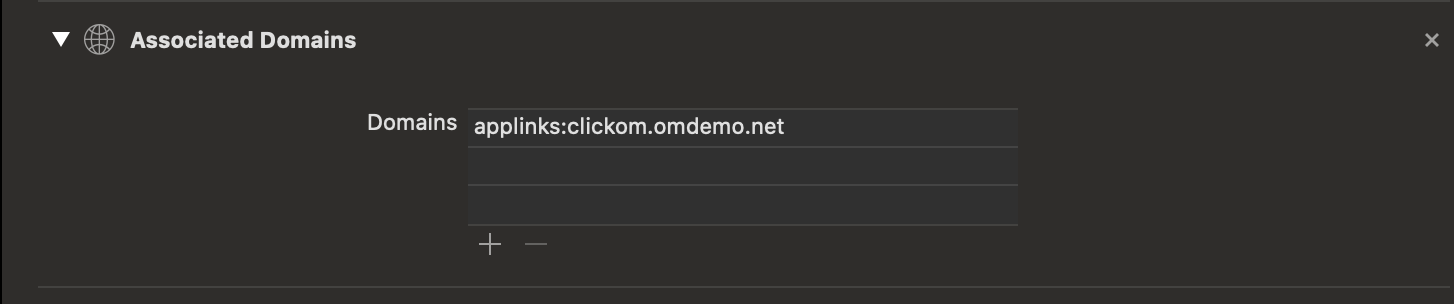
Once enabled, input your Ometria tracking domain as below.
This will ensure that when your customers click on links in Ometria emails, your app opens instead of the browser.
Note: This does not associate your website's domain with the app, only the tracking domain.
Create an apple-app-site-association file and send it to your Ometria contact.
The apple-app-site-association file is used to create a relationship between a domain and your app. You can find out more about it here but for the purpose of this guide we will go with the most basic example which should look like this:
{
    "applinks": {
        "details": [
            {
                "appID": "<Your_team_identifier>.<Your_bundle_id>",
                "paths": ["*"]
            }
        ]
    }
}
Save it and name it "apple_app_site_association" (notice that no extension has been used, although it's just a normal JSON file). Then send it to your Ometria contact - we will upload this for you so that it will be available behind the tracking domain.
Once you are done, you should be able to successfully open your app by selecting a URL received from Ometria.
Process universal links inside the app
The final step is to process the URLs in your app and take the user to the appropriate sections of the app. Note that you need to implement the mapping between your website's URLs and the screens of your app.
See also Linking push notifications to app screens.
If you are dealing with normal URLs pointing to your website, you can decompose it into different path components and parameters. This will allow you to source the required information to navigate through to the correct screen in your app.
However, Ometria emails contain obfuscated tracking URLs, and these need to be converted back to the original URL, pointing to your website, before you can map the URL to an app screen. To do this, the SDK provides a method called processUniversalLink:
func application(_ application: UIApplication, continue userActivity: NSUserActivity, restorationHandler: @escaping ([UIUserActivityRestoring]?) -> Void) -> Bool {
    if let url = userActivity.webpageURL {
        // you can check here whether the URL is one that you can handle without converting it back
        Ometria.sharedInstance().processUniversalLink(url) { (url, error) in
            if let url = url {
                // you can now handle the retrieved url as you would any other url from your website
            } else {
                // an error may have occurred
            }
        }
    }
}
Warning: The method above runs asynchronously. Depending on the Internet speed on the device, processing time can vary. For best results, you could implement a loading state that is displayed while the URL is being processed.
If you have done everything correctly, the app should now be able to open universal links and allow you to handle them inside the app.
GitHub
| link |
| Stars: 3 |
| Last commit: 9 weeks ago |
Dependencies
Release Notes
- update NotificationServiceExtension functionality
- expose NotificationServiceExtension functionality to ReactNative
- refactor NotificationHandler to remove coupling with UNNotificationCenter related objects
Swiftpack is being maintained by Petr Pavlik | @ptrpavlik | @swiftpackco | API | Analytics