![]()
MPush iOS SDK
![]()
![]()
![]()
![]()
![]()
MPush is a client libary, written in Swift, that can be used to interact with the MPush API. The minimum deplaoyment target for the library is iOS 11.0.
MPush uses a classic Pub/Sub pattern, you will register your devce to topics, then from the MPush apis you will be able to send notifications to those topics and all device registered will receive a notification.
A topic can represent whatever you want in your system (e.g. the entire app, a user a subset of user with a common charachteristic) so you will be able to choose the granularity of the notifications.
Minimum Requirements
- Swift 4.0+
- Xcode - The easiest way to get Xcode is from the App Store, but you can also download it from developer.apple.com if you have an AppleID registered with an Apple Developer account.
Installation
Swift Package Manager
With Xcode 11 you can start using Swift Package Manager to add MPushSwift to your project. Follow those simple steps:
- In Xcode go to File > Swift Packages > Add Package Dependency.
- Enter
https://github.com/Mumble-SRL/MPushSwift.gitin the "Choose Package Repository" dialog and press Next. - Specify the version using rule "Up to Next Major" with "0.2.13" as its earliest version and press Next.
- Xcode will try to resolving the version, after this, you can choose the
MPushSwiftlibrary and add it to your app target.
CocoaPods
CocoaPods is a dependency manager for iOS, which automates and simplifies the process of using 3rd-party libraries in your projects. You can install CocoaPods with the following command:
$ gem install cocoapods
To integrate the MPush into your Xcode project using CocoaPods, specify it in your Podfile:
platform :ios, '10.0'

target 'TargetName' do
	use_frameworks!

    pod 'MPushSwift'
end
Then, run the following command:
$ pod install
CocoaPods is the preferred methot to install the library.
Carthage
Carthage is a decentralized dependency manager that builds your dependencies and provides you with binary frameworks. To integrate MPushSwift into your Xcode project using Carthage, specify it in your Cartfile:
github "Mumble-SRL/MPushSwift"
Manual installation
To install the library manually drag and drop the folder MPush to your project structure in XCode.
Note that MPush has MBNetworking (1.0) as dependency, so you have to install also this library.
Usage
The first thig you have to do is implement Push Notifications using the UserNotifications framework.
You will be guided through all the steps needed to have a functional project wth the push notifications, if you have already done it you can skip to the Integrate MPush section of this README.
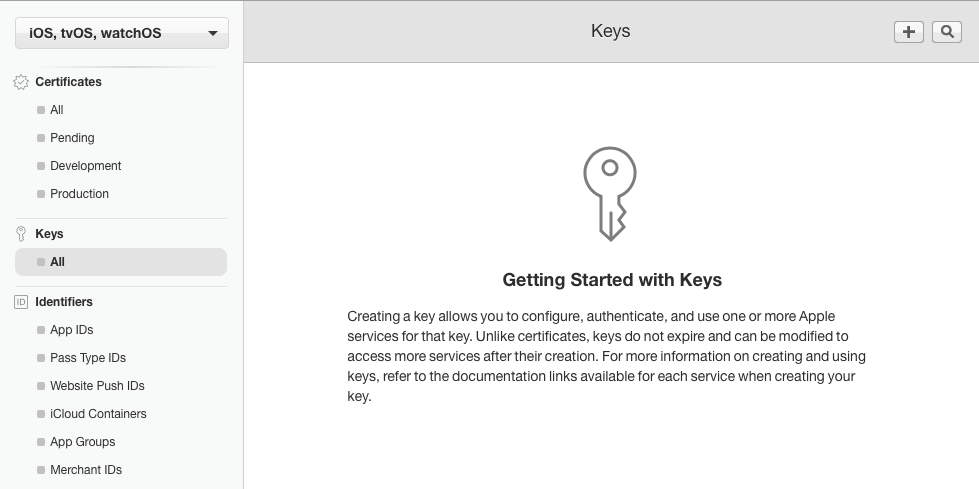
Create a key
Go to developer.apple.com with an admin account and under Keys -> All click the plus button in the top right corner. Specify a name for your key and enable Apple Push Notifications service (APNs).
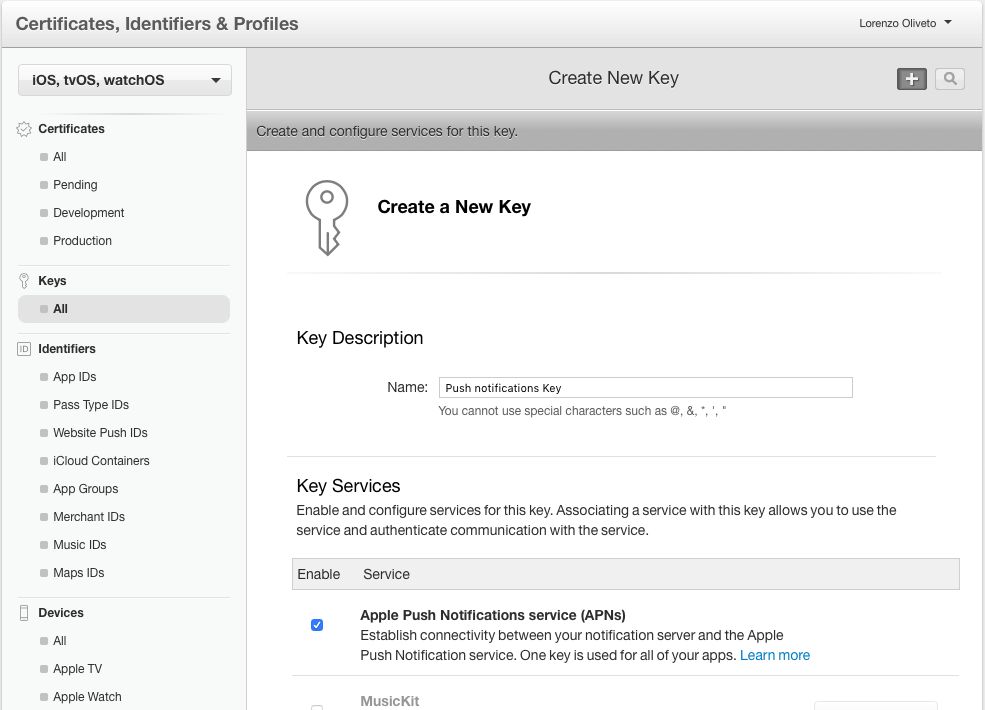
Then download the .p8 key file created and upload it in our dashboard.
Note that the key created is valid for all the apps of your profile and can't be re-downloaded, keep it in a safe place because you will likely have to resue it.
Add notifications to your app
Now go to your app settings under Identifier -> AppId and enable the notifications services following the steps. After that you need to update the Provisioning Profile for your app or create a new one because push notifications donesn't work for applications signed with a wildcard Provisioning Profile.
Now it's finally time to move to XCode. Open your project and enable push notifications in the capabilities tab.

In AppDelegate.swift add
import UserNotifications

func application(_ application: UIApplication, didFinishLaunchingWithOptions launchOptions: [UIApplication.LaunchOptionsKey: Any]?) -> Bool {
    ...

    let userNotificationCenter = UNUserNotificationCenter.current()
    userNotificationCenter.delegate = self

    self.registerForPushNotifications()
	...
}

// MARK: - Notifications

func registerForPushNotifications() {
    UNUserNotificationCenter.current().requestAuthorization(options: [.alert, .sound, .badge]) { (granted, _) in
        guard granted else { return }
        self.getNotificationSettings()
    }
}

func getNotificationSettings() {
    UNUserNotificationCenter.current().getNotificationSettings { (settings) in
        guard settings.authorizationStatus == .authorized else { return }
        DispatchQueue.main.async {
            UIApplication.shared.registerForRemoteNotifications()
        }
    }
}

extension AppDelegate: UNUserNotificationCenterDelegate {
    func userNotificationCenter(_ center: UNUserNotificationCenter,
                                willPresent notification: UNNotification,
                                withCompletionHandler
                                completionHandler: @escaping (UNNotificationPresentationOptions) -> Void) {
        completionHandler(UNNotificationPresentationOptions.alert)
    }

    func userNotificationCenter(_ center: UNUserNotificationCenter,
                                didReceive response: UNNotificationResponse,
                                withCompletionHandler
                                completionHandler: @escaping () -> Void) {
        completionHandler()
    }
}
Integrate MPush
To integrate MPush to your implementation you need to add this in your AppDelegate
import MPushSwift

func application(_ application: UIApplication, didFinishLaunchingWithOptions launchOptions: [UIApplication.LaunchOptionsKey: Any]?) -> Bool {
    ...
    MPush.token = "YOUR_PUSH_TOKEN"
    ...
}

...

func application(_ application: UIApplication, didRegisterForRemoteNotificationsWithDeviceToken deviceToken: Data) {
    MPush.registerDevice(deviceToken: deviceToken, success: {
        MPush.register(toTopic: MPTopic("YOUR_TOPIC"))
        // OR if you have more than one topic
        // MPush.register(toTopics: [MPTopic("TOPIC1"), MPTopic("TOPIC2")])
    })
}
You're set 🎉, the device will receive notifications for the topic is registered to.
MPTopic additional parameters
When creating topic you can specify additional parameters:
title: a title fot that topic that will be displayed in the dashboard, if not specified it has the same value as the topic idsingle: If the topic identifies a single user or a group of users, defaults tofalse
Rich Notifications
To implement rich notifications you will have to create a new Notificaiton Service Target that will be responsible for downloading the media of the notification and attach it to the notification object.
In Xcode go to File -> New -> Target and choose Notification Service Extension
Keep in mind that notifications don't have much time to download the media attached, if the dowload doen't finish in a short period of time the notification will be delivered without the media.
To handle MPush attachments add this your NotificationService should look like this:
override func didReceive(_ request: UNNotificationRequest, withContentHandler contentHandler: @escaping (UNNotificationContent) -> Void) {
    self.contentHandler = contentHandler
    bestAttemptContent = (request.content.mutableCopy() as? UNMutableNotificationContent)

    if let bestAttemptContent = bestAttemptContent {
        if let mediaUrl = request.content.userInfo["media_url"] as? String, let fileUrl = URL(string: mediaUrl) {
            downloadMedia(fileUrl: fileUrl, request: request, bestAttemptContent: bestAttemptContent) {
                contentHandler(bestAttemptContent)
            }
        } else {
            contentHandler(bestAttemptContent)
        }
    }
}

func downloadMedia(fileUrl: URL, request: UNNotificationRequest, bestAttemptContent: UNMutableNotificationContent, completion: @escaping () -> Void) {
    let task = URLSession.shared.downloadTask(with: fileUrl) { (location, _, _) in
        if let location = location {
            let tmpDirectory = NSTemporaryDirectory()
            let tmpFile = "file://".appending(tmpDirectory).appending(fileUrl.lastPathComponent)
            let tmpUrl = URL(string: tmpFile)!
            do {
                try FileManager.default.moveItem(at: location, to: tmpUrl)

                var options: [String: String]? = nil
                if let type = request.content.userInfo["media_type"] as? String {
                    options = [String: String](https://raw.github.com/Mumble-SRL/MPush-Swift/master/)
                    options?[UNNotificationAttachmentOptionsTypeHintKey] = type
                }
                if let attachment = try? UNNotificationAttachment(identifier: "media." + fileUrl.pathExtension, url: tmpUrl, options: options) {
                    bestAttemptContent.attachments = [attachment]
                }
                completion()
            } catch {
                completion()
            }
        }
    }
    task.resume()
}

override func serviceExtensionTimeWillExpire() {
    // Called just before the extension will be terminated by the system.
    // Use this as an opportunity to deliver your "best attempt" at modified content, otherwise the original push payload will be used.
    if let contentHandler = contentHandler, let bestAttemptContent =  bestAttemptContent {
        contentHandler(bestAttemptContent)
    }
}
With this code we download the attachemnt, if exists, and move it to a temporary directory. Then we add it to our notification with
if let attachment = try? UNNotificationAttachment(identifier: "media." + fileUrl.pathExtension, url: tmpUrl, options: options) {
    bestAttemptContent.attachments = [attachment]
}
License
MPush is released under the MIT license. See LICENSE for details.
GitHub
| link |
| Stars: 1 |
| Last commit: 1 year ago |
Dependencies
Swiftpack is being maintained by Petr Pavlik | @ptrpavlik | @swiftpackco | API | Analytics